👉🏻 리눅스서버에서 테스트 한 내용입니다.
This is the content tested on a Linux server.
👉🏻 Let’s Encrypt로 https를 구현하는 방법입니다.
This is how to implement HTTPS with Let’s Encrypt.
👉🏻 방화벽오픈 / Firewall open
— 아래는 iptables 방화벽 오픈 하는 내용입니다.
Below is the content for opening the iptables firewall.
$ sudo iptables -I INPUT -p tcp --dport 80 -j ACCEPT
$ sudo iptables -I INPUT -p tcp --dport 443 -j ACCEPT
$ sudo iptables -I INPUT -p tcp --dport 5080 -j ACCEPT

# iptables-persistent설치안한경우
$ sudo apt install iptables-persistent

# 설정 내용저장 / Save settings
$ sudo netfilter-persistent save
👉🏻 openssl이설치되어 있지 않으면 설치합니다.
If openssl is not installed, install it.
sudo apt update
sudo apt install g++ libssl-dev openssl wget -y
⭐️ openssl은 3.0이상을 사용해야합니다.
You must use openssl 3.0 or higher.
⭐️ openssl 3.x이상을 사용하려면 우분투 22.04버전이상이어야합니다.
To use openssl 3.x or higher, you must be running Ubuntu version 22.04 or higher.
👉🏻 Let’s Encrypt인증서 받기 / Get Let’s Encrypt Certificate
— 다음과 같은 화면이 보이면 성공한 것입니다.
If you see the following screen, you have succeeded.
–방화벽이나 포트가 막히면 인증서 발급이 되지 않습니다.
If the firewall or ports are blocked, the certificate cannot be issued.
$ sudo certbot certonly --standalone -d host.domain.com
Saving debug log to /var/log/letsencrypt/letsencrypt.log
Requesting a certificate for host.domain.com

Successfully received certificate.
Certificate is saved at: /etc/letsencrypt/live/host.domain.com/fullchain.pem
Key is saved at:         /etc/letsencrypt/live/host.domain.com/privkey.pem
This certificate expires on 2028-10-01.
These files will be updated when the certificate renews.
Certbot has set up a scheduled task to automatically renew this certificate in the background.

- - - - - - - - - - - - - - - - - - - - - - - - - - - - - - - - - - - - - - - -
If you like Certbot, please consider supporting our work by:
 * Donating to ISRG / Let's Encrypt:   https://letsencrypt.org/donate
 * Donating to EFF:                    https://eff.org/donate-le
- - - - - - - - - - - - - - - - - - - - - - - - - - - - - - - - - - - - - - - -
$
👉🏻 현재 서버 디렉토리로 인증서를 복사합니다.
Copy certificate to current server directory
$ sudo cp /etc/letsencrypt/live/host.domain.com/fullchain.pem ./
$ sudo cp /etc/letsencrypt/live/host.domain.com/privkey.pem ./

# 내 계정으로 소유권 변경 / Change ownership to my account
$ sudo chown username:username *.pem
👉🏻 코드/Code
✔️ 기존의 서버 코드에서 인증서 부분만 수정합니다.
Modify only the certificate part of the existing server code.
#define CPPHTTPLIB_OPENSSL_SUPPORT
#include "httplib.h"
#include <iostream>
int main( ) {
// 인증서와 키 파일 경로를 지정합니다.
// Specify the certificate and key file paths.
httplib::SSLServer svr("./fullchain.pem", "./privkey.pem" );
if (!svr.is_valid()) {
std::cerr << "SSL 서버 설정 실패 / SSL server setup failed!" << std::endl;
return 1;
}
svr.Get("/", [](const httplib::Request&, httplib::Response& res ) {
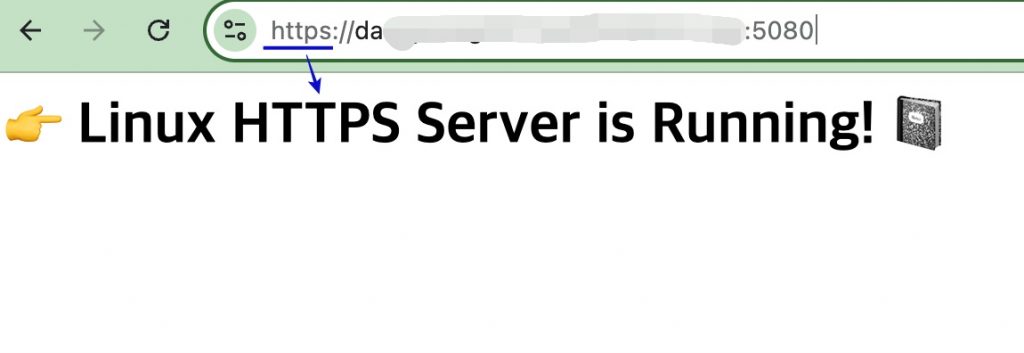
res.set_content("<h1> 👉 Linux HTTPS Server is Running! 📓 </h1>", "text/html; charset=utf-8");
});
std::cout << "Server Listening: https://0.0.0.0:5080" << std::endl;
svr.listen("0.0.0.0", 5080 );
return 0;
}👉🏻 컴파일 / Compiling
g++ -o server server.cpp -std=c++11 -pthread -lssl -lcrypto👉🏻 서버실행 / Run server
./server👉🏻 브라우저접속 / Browser access