공식문서 : https://antmedia.io/docs/category/guides/
– 로그인 하고 좌측 메뉴의 LiveApp을 클릭하면 아래와 같은 화면을 볼 수 있습니다.
After logging in and clicking LiveApp on the left menu, you will see the screen below.
– 간단히 둘러보겠습니다.
Let’s take a quick look around.
1.Live Streams
– 이 탭에서 방송을 생성합니다.
Create a broadcast in this tab.
– 카메라 이미지가 있는 부분은 생성된 방송 채널 입니다.
The part with the camera image is the generated broadcast channel.
– 우측의 녹색 버튼을 클릭해서 방송을 생성 할 수 있습니다.
You can create a broadcast by clicking the green button on the right.

2.VoD
– 이 탭에서 mp4같은 동영상 파일을 업로드 할 수 있습니다.
You can upload video files such as mp4 in this tab.
– 업로드된 영상을 스트리밍 합니다.
Stream uploaded videos.

3.Settings
-설정 부분으로 빨간색 체크 부분만 살펴 봅니다.
In the settings section, we only look at the red checked areas.
-HLS지원을 위해서 아래부분이 선택되어 있는지 확인 합니다.
Make sure the section below is selected for HLS support.
-HLS Streaming :
Create HLS Streaming과 Delete HLS file after the stream is finished를 선택되어 있는지 확인 합니다.
Make sure “Create HLS Streaming and Delete HLS file after the stream is finished” are selected.
-이 부분은 나중에 앱개발을 할 때 필요합니다.
This part will be needed later when developing the app.
-HLS스트리밍방식은 ios와 android모두 지원합니다.
HLS streaming method is supported on both iOS and Android.

4.방송생성/Broadcast creation
-Live Streams 탭 에서 우측에 New LIve Stream 녹색버튼을 클릭합니다.
In the Live Streams tab, click the green New LIve Stream button on the right.
-아래의 드롭다운 메뉴에서 Live Stream을 선택합니다.
Select Live Stream from the drop-down menu below.

-그러면 다음과 같은 화면을 보실 수 있습니다.
You will see a screen like this
-Name과 Stream Id는 여러분이 원하시는 문자를 입력하시면 됩니다.
You can enter any character you want for the Stream Id.
-그리고 Create버튼을 클릭해서 방송을 생성합니다.
Then click the Create button to create a broadcast.

– 방송을 생성하면 다음과 같이 리스트를 볼 수 있습니다.
When you create a broadcast, you can see a list like this

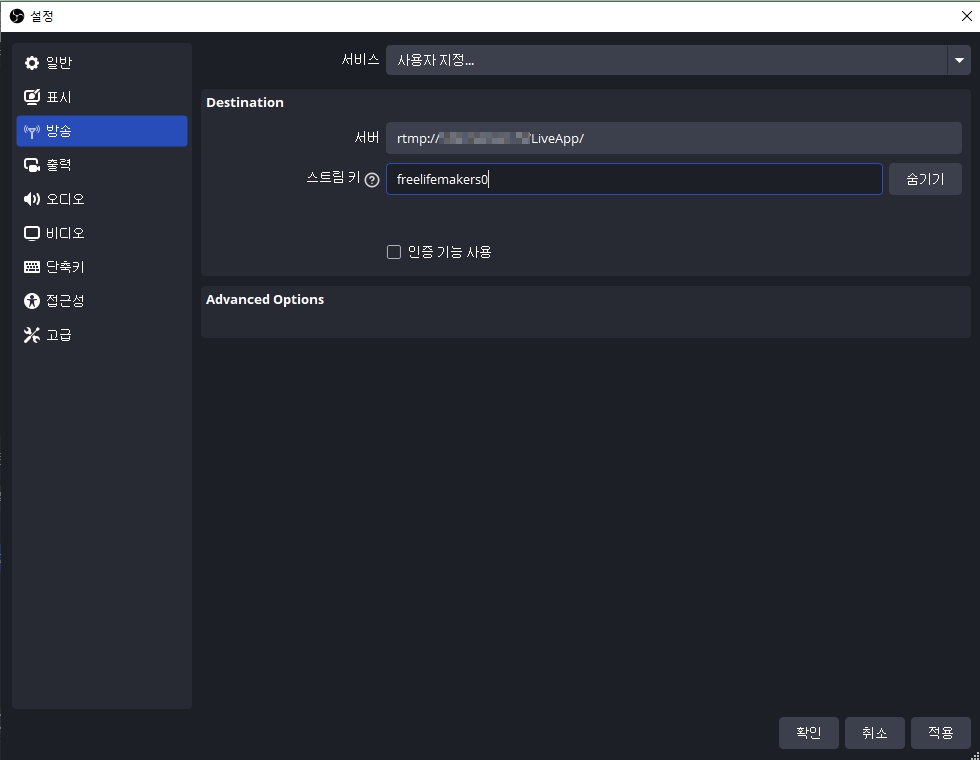
5. OBS셋팅/OBS Settings
– OBS실행 시키고 우측 하단에 설정 버튼을 클릭합니다.
Run OBS and click the settings button at the bottom right.


-OBS에서 server설정과 스트림키를 입력합니다.
Enter server settings and stream key in OBS.
-서버 주소는 rtpm://도메인 또는 아이피주소/LiveApp/입니다.
The server address is rtpm://domain or IP address/LiveApp/.
-스트림키는 바로 위의 “4.방송생성” 부분의 이미지를 참조 하세요
For the stream key, please refer to the image in the “4. Broadcast Creation” section just above.
– 설정이 완료되었으면 적용을 클릭합니다.
Once the settings are complete, click Apply.

6.방송시작/Start broadcasting
– OBS에서 방송을 시작하면 다음과 같이 방송이 시작되는 것을 볼 수 있습니다.
When you start broadcasting in OBS, you will see the broadcast start like this


– 셋팅이 정상이라면 서버에서는 다음과 같이 방송이 시작되고 있는 것을 볼 수 있습니다.
If the settings are correct, you will see the broadcast starting on the server as follows.

-방송이 시작되면 플레이 버튼을 볼 수 있습니다.
Once the broadcast starts, you will see a play button.
-이 버튼을 클릭하면 방송하고 있는 웹 플레이어를 볼 수 있습니다.
Clicking this button will allow you to view the web player that is broadcasting.


– 우측 Action 아래 햄버거 메뉴를 클릭하면 드롭다운 메뉴를 볼 수 있습니다.
If you click on the hamburger menu under Action on the right, you will see a drop-down menu.
– Copy Embeded Code를 선택하시면 html코드가 복사됩니다.
If you select Copy Embedded Code, the HTML code will be copied.
– 메모장에 ctrl+v를 하시면 복사된 html코들 볼 수 있습니다.
If you press ctrl+v in notepad, you can see the copied html codes.
– 이 코드를 여러분의 웹사이트 등에서 사용 하시면 됩니다.
You can use this code on your website, etc.

-메모장 html 코드
Notepad html code

