1.핵심 개념 / key concepts
- 이미지(Image): 컨테이너를 만드는 데 필요한 모든 파일과 설정을 포함하는 읽기 전용 템플릿입니다. 예를 들어,
ubuntu이미지에는 우분투 운영체제의 최소 파일 시스템이 들어 있고,python:3.9이미지에는 파이썬 3.9가 설치된 환경이 담겨 있습니다. 이미지는 Docker Hub와 같은 레지스트리에서 다운로드하거나, Dockerfile을 사용해 직접 만들 수 있습니다.
Image: A read-only template containing all the files and settings needed to create a container. For example, the ubuntu image contains a minimal filesystem for the Ubuntu operating system, while the python:3.9 image contains an environment with Python 3.9 installed. Images can be downloaded from registries like Docker Hub, or built directly using a Dockerfile.
- 컨테이너(Container): 이미지의 실행 가능한 인스턴스입니다. 이미지를 통해 생성된 독립적인 실행 환경이며, 가볍고 격리되어 있어 특정 애플리케이션을 실행하는 데 최적화되어 있습니다.
Container: A runnable instance of an image. It’s a self-contained execution environment created from an image, lightweight and isolated, optimized for running a specific application.
- Dockerfile: 이미지를 만들기 위한 명령어 스크립트입니다. 어떤 OS를 기반으로 할지, 어떤 파일을 추가할지, 어떤 프로그램을 설치할지 등을 정의합니다.
docker build명령어를 통해 Dockerfile로부터 이미지를 생성합니다.
Dockerfile: A command script for building an image. It defines the operating system to be used, the files to be added, and the programs to be installed. The docker build command creates an image from the Dockerfile.
- Docker Hub: 전 세계 개발자들이 만든 이미지를 공유하는 공식 레지스트리입니다.
Docker Hub: The official registry where developers around the world share images.
2.기본 명령어 / basic commands
터미널(또는 명령 프롬프트)에서 아래 명령어들을 직접 실행해 보세요.
Try running the commands below directly in the terminal (or command prompt).
1. Docker 상태 확인 / Check Docker status
docker --version: Docker 버전 확인 / Check Docker versiondocker info: Docker 시스템 전체 정보 확인 / Check the entire Docker system information
2. 이미지 관리 / Image Management
docker pull [이미지 이름]: Docker Hub에서 이미지 다운로드. / Download the image from Docker Hub.- 예:
docker pull ubuntu(Ubuntu 기본 이미지 다운로드 / download Ubuntu base image) - 예:
docker pull python:3.9(파이썬 3.9 이미지 다운로드 / Download Python 3.9 images)
- 예:
docker images: 로컬에 다운로드된 모든 이미지 목록 확인 / Check the list of all images downloaded locallydocker rmi [Image ID or Name]: 로컬 이미지 삭제 / Delete local image
3. 컨테이너 실행 및 관리 / Running and managing containers
docker run [옵션] [이미지 이름] [명령어]: 가장 핵심적인 명령어. 이미지로부터 새로운 컨테이너를 만들고 실행합니다.-it: 컨테이너와 상호작용 가능한 터미널 환경을 열어줍니다. (-i: 상호 작용,-t: 터미널 할당)-d: 컨테이너를 백그라운드에서 실행합니다. (detached 모드)-p [호스트 포트]:[컨테이너 포트]: 호스트 컴퓨터의 포트와 컨테이너 내부의 포트를 연결합니다. (포트 매핑)--name [이름]: 컨테이너에 알아보기 쉬운 이름을 지정합니다.
docker run [options] [image name] [command]: This is the most essential command. It creates and runs a new container from an image.
-it: Opens a terminal environment for interacting with the container. (-i: interactive, -t: terminal allocation)
-d: Runs the container in the background (detached mode)
-p [host port]:[container port]: Links a port on the host computer to a port inside the container. (port mapping)
–name [name]: Give the container a friendly name.
- 실습1: 간단한 컨테이너 실행 / Exercise 1: Running a Simple Container
docker run hello-world이 명령어는 hello-world 이미지를 다운로드하여 컨테이너를 만들고 실행하며, “Hello from Docker!” 메시지를 출력합니다.
This command downloads the hello-world image, creates a container, runs it, and prints the message “Hello from Docker!”
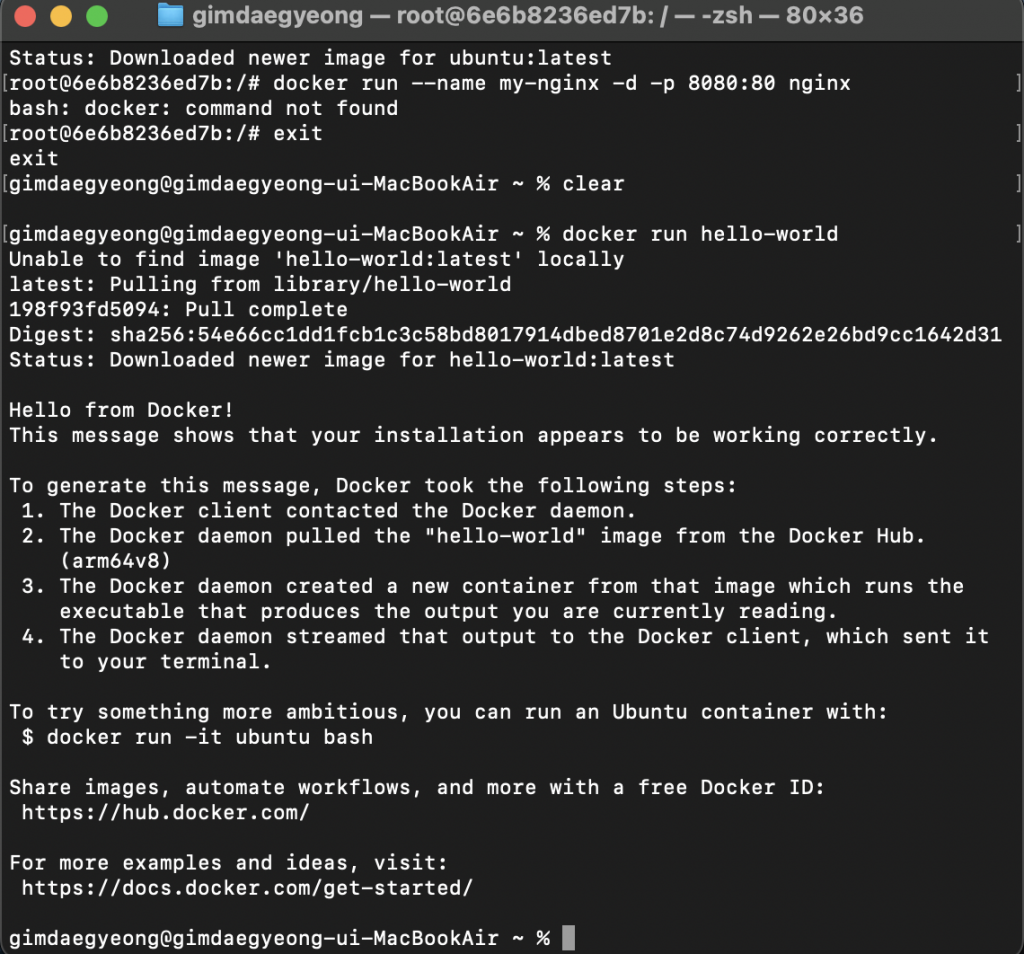
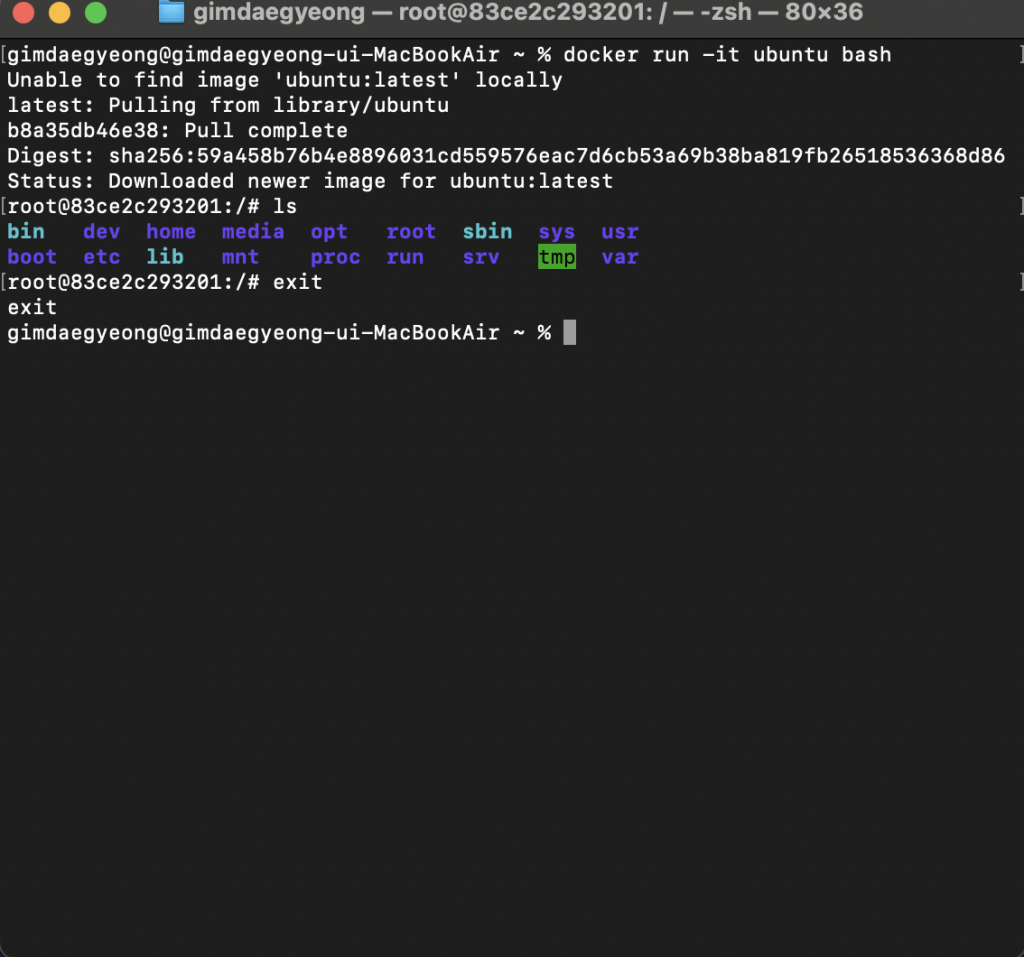
- 실습2: Ubuntu 컨테이너에서 bash 셸 열기 / Exercise 2: Opening a Bash Shell in an Ubuntu Container
docker run -it ubuntu bash - 컨테이너 내부로 들어가 터미널을 사용할 수 있습니다.
exit를 입력하면 컨테이너에서 나옵니다.
You can enter the container and use the terminal. Type exit to exit the container.
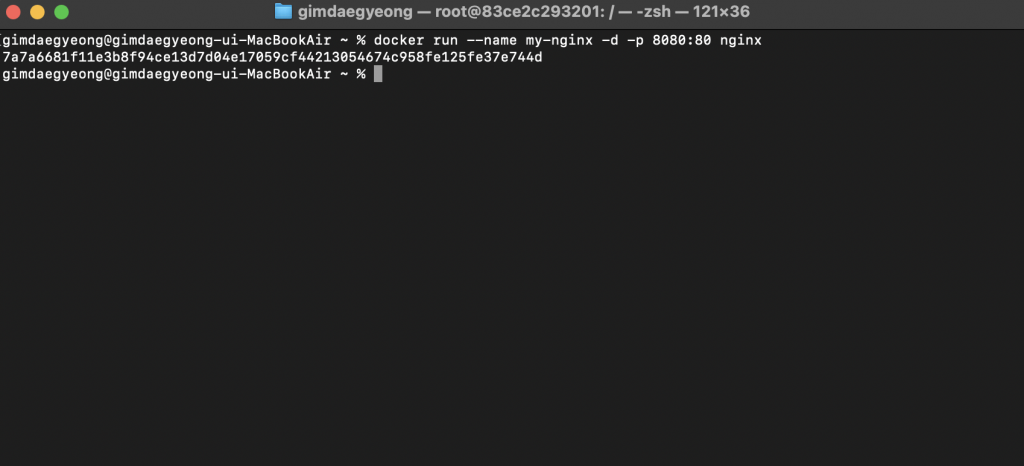
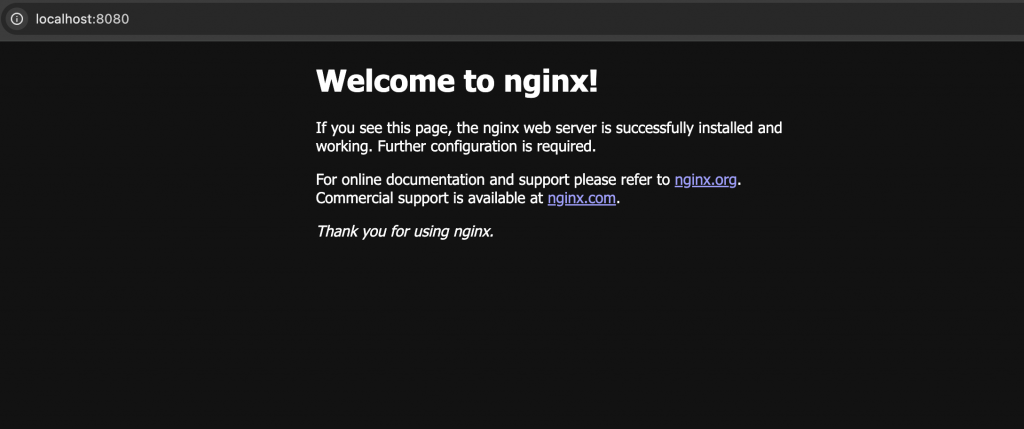
- 실습3: 백그라운드에서 Nginx 웹 서버 실행
Exercise 3: Running an Nginx Web Server in the Background
docker run --name my-nginx -d -p 8080:80 nginxdocker ps: 현재 실행 중인 컨테이너 목록 확인 (-a옵션을 추가하면 종료된 컨테이너까지 모두 확인)
docker ps: List currently running containers (add the -a option to list all terminated containers)docker stop [컨테이너 ID 또는 이름]: 실행 중인 컨테이너 중지
docker stop [container ID or name]: Stop a running containerdocker start [컨테이너 ID 또는 이름]: 중지된 컨테이너 다시 시작
docker start [container ID or name]: Restart a stopped containerdocker rm [컨테이너 ID 또는 이름]: 컨테이너 삭제
docker rm [container ID or name]: Delete a container
- 컨테이너 정지 시키기 / Stop the container
— docker ps : 현재 실행되고 있는 컨테이너 목록 확인
docker ps: Check the list of currently running containers
— docker stop [NAMES or CONTAINOR ID] : 컨테이너 정지 시키기
docker stop [NAMES or CONTAINOR ID] : Stop containers
% docker ps
CONTAINER ID   IMAGE     COMMAND                   CREATED       STATUS       PORTS                                     NAMES
7a7a6681f11e   nginx     "/docker-entrypoint.…"   3 hours ago   Up 3 hours   0.0.0.0:8080->80/tcp, [::]:8080->80/tcp   my-nginx

% docker stop my-nginx
my-nginx

~ %
- 정지된 컨테이너 다시 시작 / Restart a stopped container
— docker ps -a :
실행 중인 컨테이너뿐만 아니라, 이전에 실행되었다가 현재 종료(Exited)된 컨테이너까지 포함하여 도커가 관리하는 모든 컨테이너 목록을 보여달라는 옵션입니다.
This option displays a list of all containers managed by Docker, including not only running containers but also containers that were previously running but have now exited.
— docker start [NAMES or CONTAINER ID] : 정지된 컨테이너 다시 시작 / Restart a stopped container
% docker ps
CONTAINER ID   IMAGE     COMMAND   CREATED   STATUS    PORTS     NAMES

% docker ps -a
CONTAINER ID   IMAGE                             COMMAND                   CREATED       STATUS                      PORTS     NAMES
7a7a6681f11e   nginx                             "/docker-entrypoint.…"   4 hours ago   Exited (0) 53 seconds ago             my-nginx
83ce2c293201   ubuntu                            "bash"                    4 hours ago   Exited (0) 4 hours ago                lucid_hoover
8dbae314cb2e   hello-world                       "/hello"                  4 hours ago   Exited (0) 4 hours ago                optimistic_gagarin
b6f41ebadd23   docker/welcome-to-docker:latest   "/docker-entrypoint.…"   3 weeks ago   Exited (0) 4 hours ago                welcome-to-docker

% docker start my-nginx
my-nginx

%
- 컨테이너 영구 삭제 / Permanently delete container
— docker rm [NAMES or CONTAINER ID]
% docker rm my-nginx
my-nginx

% docker ps -a
CONTAINER ID   IMAGE                             COMMAND                   CREATED       STATUS                   PORTS     NAMES
83ce2c293201   ubuntu                            "bash"                    4 hours ago   Exited (0) 4 hours ago             lucid_hoover
8dbae314cb2e   hello-world                       "/hello"                  4 hours ago   Exited (0) 4 hours ago             optimistic_gagarin
b6f41ebadd23   docker/welcome-to-docker:latest   "/docker-entrypoint.…"   3 weeks ago   Exited (0) 4 hours ago             welcome-to-docker

%
3.Dockerfile로 커스텀 이미지 만들기
Creating a custom image with a Dockerfile
–프로젝트 폴더를 만들고 그 안에 **Dockerfile**이라는 이름의 파일을 생성합니다.
Create a project folder and create a file named Dockerfile inside it.
–간단한 웹 애플리케이션을 위한 Dockerfile 예시를 작성해 보세요.
Write an example Dockerfile for a simple web application.
# 1단계: Node.js 14 기반 이미지를 사용합니다.
# Step 1: Use a Node.js 14 based image.
FROM node:14
# 2단계: 컨테이너 내부의 작업 디렉토리를 설정합니다.
# Step 2: Set up a working directory inside the container
WORKDIR /app
# 3단계: 로컬의 package.json과 package-lock.json을 컨테이너로 복사합니다.
# Step 3: Copy local package.json and package-lock.json to the container.
COPY package*.json ./
# 4단계: 필요한 모듈을 설치합니다.
# Step 4: Install the required modules.
RUN npm install
# 5단계: 로컬의 모든 파일을 컨테이너로 복사합니다.
# Step 5: Copy all local files to the container.
COPY . .
# 6단계: 애플리케이션이 사용할 포트를 노출합니다.
# Step 6: Expose the ports your application will use.
EXPOSE 3000
# 7단계: 컨테이너가 시작될 때 실행할 명령어를 정의합니다.
# Step 7: Define the command to run when the container starts.
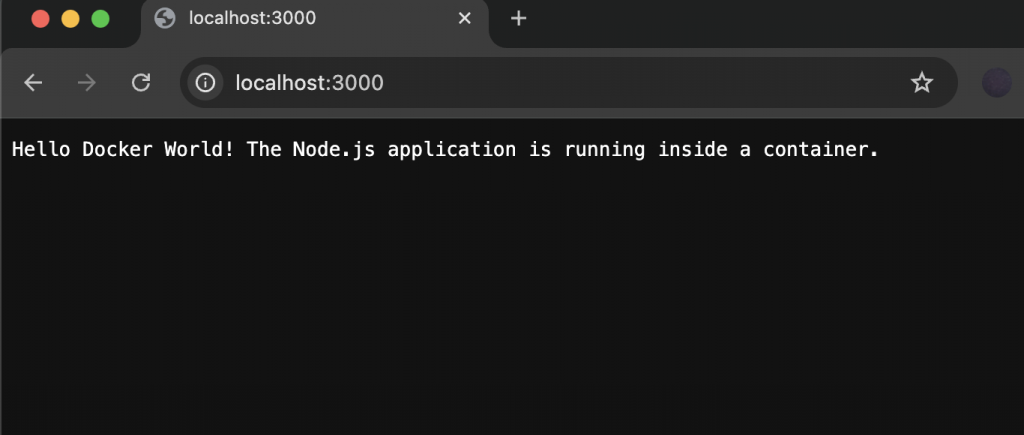
CMD ["node", "app.js"]— app.js파일을 만들고 다음 코드를 입력합니다.
Create a file called app.js and enter the following code:
// Node.js의 내장 모듈인 'http'를 불러옵니다.
// Import 'http', a built-in module of Node.js.
const http = require("http");

// 서버가 사용할 포트 번호를 정의합니다. (Dockerfile의 EXPOSE 3000과 일치)
const port = 3000;

// 서버 요청에 대한 응답을 처리할 함수를 정의합니다.
// Define the port number the server will use (matching EXPOSE 3000 in the Dockerfile)
const requestListener = function (req, res) {

  // 응답 헤더 설정: 상태 코드 200(성공), 콘텐츠 타입은 일반 텍스트
// Set response headers: status code 200 (success), content type plain text
  res.writeHead(200, { "Content-Type": "text/plain" });

  // 응답 본문 작성
  // Write response body
  res.end(
    "Hello Docker World! The Node.js application is running inside a container.",
  );
};

// 서버 객체를 생성하고 요청 리스너 함수를 연결합니다.
// Create a server object and attach a request listener function to it.
const server = http.createServer(requestListener);

// 지정된 포트에서 서버를 시작합니다.
// Start the server on the specified port.
server.listen(port, () => {
  console.log(`Server is running successfully on port ${port}`);
  console.log(
    "You can access it via http://localhost:8080 (or your mapped port) on your host machine.",
  );
});
–터미널에서 Dockerfile이 있는 디렉터리로 이동한 후, 다음 명령어를 실행하여 이미지를 만듭니다.
In the terminal, navigate to the directory containing the Dockerfile and run the following command to create the image.
docker build -t my-web-app .-t: 이미지에 태그(이름)를 지정합니다. / Tag (name) the image.
.: 현재 디렉터리에서 Dockerfile을 찾으라는 의미입니다 / This means find the Dockerfile in the current directory.
–만든 이미지를 기반으로 컨테이너를 실행합니다.
Run a container based on the created image.
docker run -p 3000:3000 my-web-app— 터미널에서 실행결과 / Execution result in terminal
 % docker build -t my-web-app .
[+] Building 0.9s (10/10) FINISHED                                                                                                                       docker:desktop-linux
 => [internal] load build definition from Dockerfile                                                                                                                     0.0s
 => => transferring dockerfile: 647B                                                                                                                                     0.0s
 => [internal] load metadata for docker.io/library/node:14                                                                                                               0.8s
 => [internal] load .dockerignore                                                                                                                                        0.0s
 => => transferring context: 2B                                                                                                                                          0.0s
 => [1/5] FROM docker.io/library/node:14@sha256:a158d3b9b4e3fa813fa6c8c590b8f0a860e015ad4e59bbce5744d2f6fd8461aa                                                         0.0s
 => => resolve docker.io/library/node:14@sha256:a158d3b9b4e3fa813fa6c8c590b8f0a860e015ad4e59bbce5744d2f6fd8461aa                                                         0.0s
 => [internal] load build context                                                                                                                                        0.0s
 => => transferring context: 1.06kB                                                                                                                                      0.0s
 => CACHED [2/5] WORKDIR /app                                                                                                                                            0.0s
 => CACHED [3/5] COPY package*.json ./                                                                                                                                   0.0s
 => CACHED [4/5] RUN npm install                                                                                                                                         0.0s
 => [5/5] COPY . .                                                                                                                                                       0.0s
 => exporting to image                                                                                                                                                   0.0s
 => => exporting layers                                                                                                                                                  0.0s
 => => exporting manifest sha256:85276568c119fe3721fa29d7102b10c2c06f68eac9c521830a3eebecba68b765                                                                        0.0s
 => => exporting config sha256:0dae21a620be9964866ab6d4472c820451023fc9b5023c344a93bf77b133a776                                                                          0.0s
 => => exporting attestation manifest sha256:c800ea2474841fafeaff46bee6b5904821ccd97e1c68891439d7323eaacdfd44                                                            0.0s
 => => exporting manifest list sha256:2ff4335b5ba49fc09c05ce34e644062d7e182792abe04e39e6012ce69f3147bd                                                                   0.0s
 => => naming to docker.io/library/my-web-app:latest                                                                                                                     0.0s
 => => unpacking to docker.io/library/my-web-app:latest                                                                                                                  0.0s

View build details: docker-desktop://dashboard/build/desktop-linux/desktop-linux/xgm7aa3xjeuf4ts6nwyqmwdxr
gimdaegyeong@gimdaegyeong-ui-MacBookAir docker % docker run -p 3000:3000 my-web-app
Server is running successfully on port 3000
You can access it via http://localhost:8080 (or your mapped port) on your host machine.
^C^C^C
got 3 SIGTERM/SIGINTs, forcefully exiting


% docker ps
CONTAINER ID   IMAGE        COMMAND                   CREATED          STATUS          PORTS                                         NAMES
9450cae56a9a   my-web-app   "docker-entrypoint.s…"   47 seconds ago   Up 46 seconds   0.0.0.0:3000->3000/tcp, [::]:3000->3000/tcp   hungry_turing

% docker stop hungry_turing
hungry_turing

% docker run -p 3000:3000 my-web-app
Server is running successfully on port 3000
You can access it via http://localhost:8080 (or your mapped port) on your host machine.
— 브라우저 실행결과 / Browser execution result
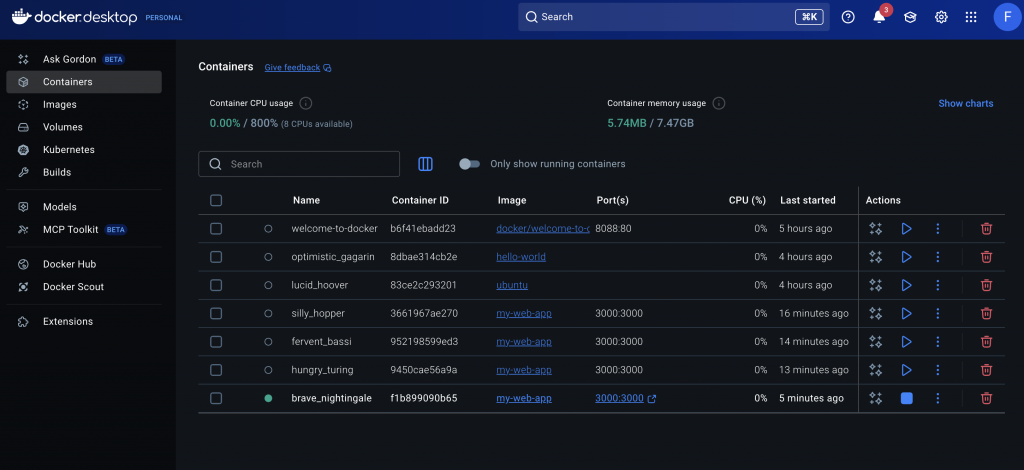
— 도커 데스크탑 컨테이너 / docker desktop container
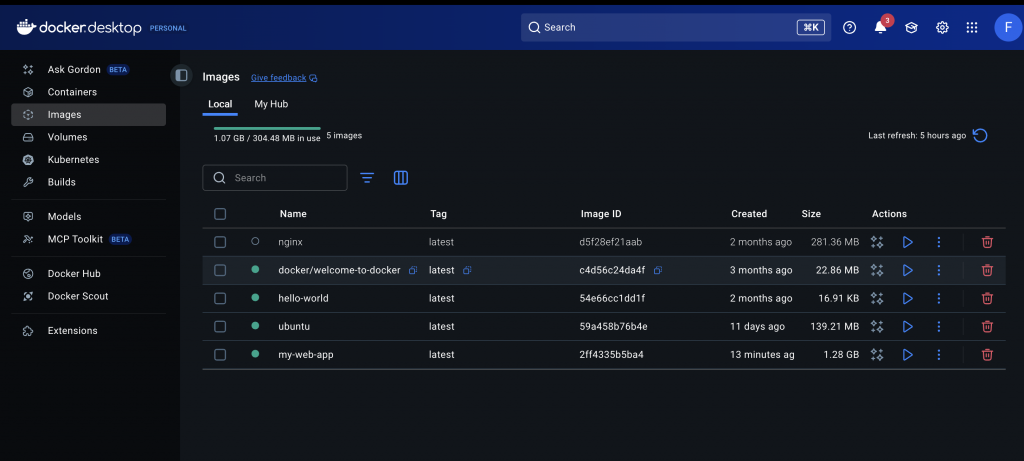
— 도커데스크탑 이미지 / Docker Desktop Image