👉🏻http 프로토콜을 이용해서 Esp32에서 nodejs서버로 메세지를 보내는 기능을 구현하는 방법을 설명합니다.
This explains how to implement the functionality to send messages from ESP32 to a Node.js server using the HTTP protocol.
👉🏻 그리고 nodejs서버에서 Esp32로 메세지를 보내는 기능을 구현하는 방법을 설명합니다.
And I will explain how to implement the functionality to send messages from a Node.js server to ESP32.
👉🏻 IDE에서 업로드 속도(11520),모듈설정(Esp32 DevModule),포트설정(/dev/cu.usbserial-120 또는 140)은 동일합니다.
In the IDE, the upload speed (11520), module setting (Esp32 DevModule), and port setting (/dev/cu.usbserial-120 or 140) are the same.
👉🏻 아래의 순서대로 실행합니다.
Execute in the following order.
1)IDE에서 아래의 코드를 업로드 합니다.
Upload the code below in the IDE.
#include <WiFi.h>
#include <WebServer.h>
#include <HTTPClient.h>

const char* ssid = "YOURID";
const char* password = "YOURPASSWORD";

WebServer server(80);

// 예시 센서값 (나중에 실제 센서 값으로 대체)
// Example sensor value (replaced with actual sensor value later)
int sensorValue = 42;

// 클라이언트가 센서값 요청
// Client requests sensor value
void handleGetSensor() {
  String json = "{\"sensor\":" + String(sensorValue) + "}";
  server.send(200, "application/json", json);
}

// 클라이언트가 ESP32에 명령 보내기
// Client sends commands to ESP32
void handlePostControl() {
  if (!server.hasArg("plain")) {
    server.send(400, "text/plain", "No body");
    return;
  }
  String body = server.arg("plain");
  Serial.print("RX control: ");
  Serial.println(body);

  // 여기서 body 파싱해서 제어 처리하면 됨
  // You can parse the body and handle the control here.
  server.send(200, "text/plain", "OK");
}
// nodejs에서 get방식 정보 받기
// Receiving GET method information in Node.js
void handleControl() {
  if (server.hasArg("led")) {
    String led = server.arg("led");
    Serial.print("LED: ");
    Serial.println(led);
  }
  server.send(200, "text/plain", "OK");
}

// ESP32가 외부 서버로 센서 데이터 보내기
// ESP32 sends sensor data to an external server

void postToServer() {
  HTTPClient http;
  http.begin("http://192.168.0.100:3000/sensor");
  http.addHeader("Content-Type", "application/json");

  String payload = "{\"sensor\":" + String(sensorValue) + "}";
  int code = http.POST(payload);
  Serial.print("POST result: ");
  Serial.println(code);

  http.end();
}

void setup() {
  Serial.begin(115200);

  WiFi.begin(ssid, password);
  while (WiFi.status() != WL_CONNECTED) { delay(500); }

  Serial.print("IP: ");
  Serial.println(WiFi.localIP());

  server.on("/sensor", HTTP_GET, handleGetSensor);

  // post
  //server.on("/control", HTTP_POST, handlePostControl);

  // get
  server.on("/control", HTTP_GET, handleControl);


  server.begin();
}

void loop() {
  server.handleClient();

  // 5초마다 외부 서버로 센서 데이터 업로드
  // Upload sensor data to external server every 5 seconds
  static unsigned long lastPost = 0;
  if (millis() - lastPost > 5000) {
    lastPost = millis();
    postToServer();
  }
}
2)nodejs 서버를 셋팅합니다.
Set up the Node.js server.
✔️프로젝트 생성 / Create project
mkdir nodejs-server
cd nodejs-server
npm init -y
npm install express
✔️ server.js
const express = require("express");
const app = express();
app.use(express.json());

// Node 18+는 fetch 내장
// Node 18+ has built-in fetch
const esp32Ip = "192.168.0.100"; //YOUR ESP32 IP ADDRESS

app.post("/sensor", (req, res) => {
  console.log("sensor data:", req.body);
  res.json({ ok: true });
});

// app.post("/control", (req, res) => {
//   console.log("control:", req.body);
//   res.json({ ok: true });
// });


app.get("/control", async (req, res) => {
  console.log("control:", req.query);
  try {
    const r = await fetch(`http://${esp32Ip}/control?led=${req.query.led}`);
    const text = await r.text();
    res.json({ ok: true, esp32: text });
  } catch (err) {
    console.error(err);
    res.status(500).json({ ok: false, error: String(err) });
  }
});


app.get("/", (req, res) => {
  res.send("Server OK");
});

app.listen(3000, () => {
  console.log("Server running on http://192.168.0.100:3000");
});
✔️ nodejs 서버 실행 / Run Node.js server
node server.js3)실행 / Run
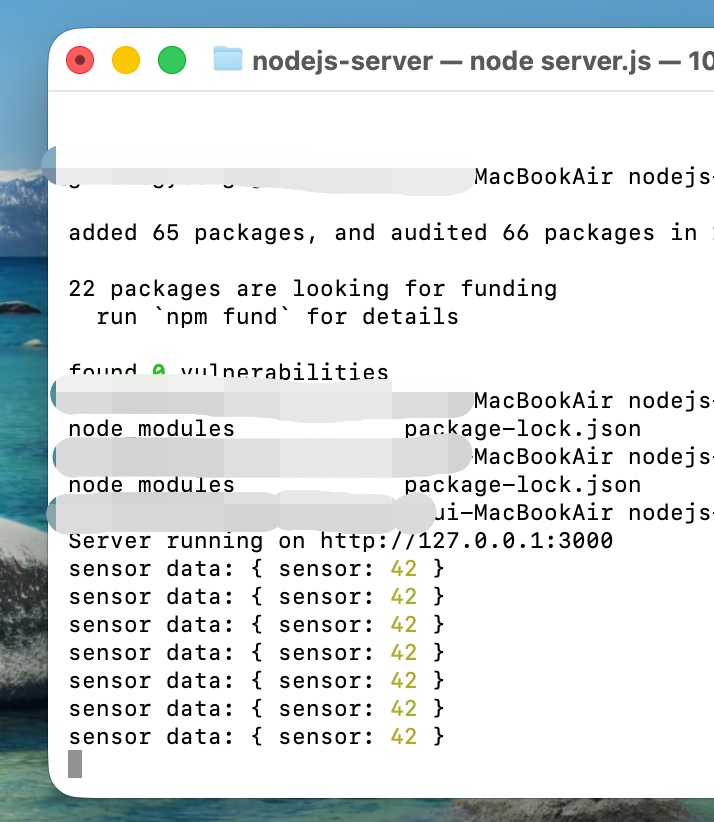
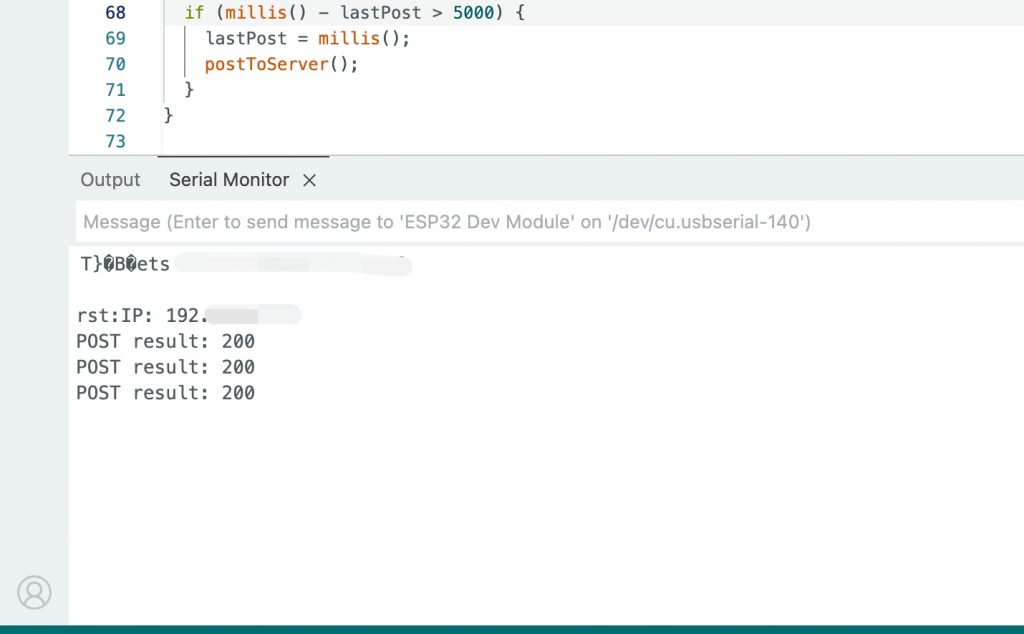
✔️ ESP32코드가 정상적으로 업로드되고 nodejs서버를 실행하면 다음과 같이 메세지가 5초마다 출력되는 것을 확인 할 수 있습니다.
Once the ESP32 code is successfully uploaded and the nodejs server is run, you can see that the following message is printed every 5 seconds.
— nodejs server
— Arduino IDE
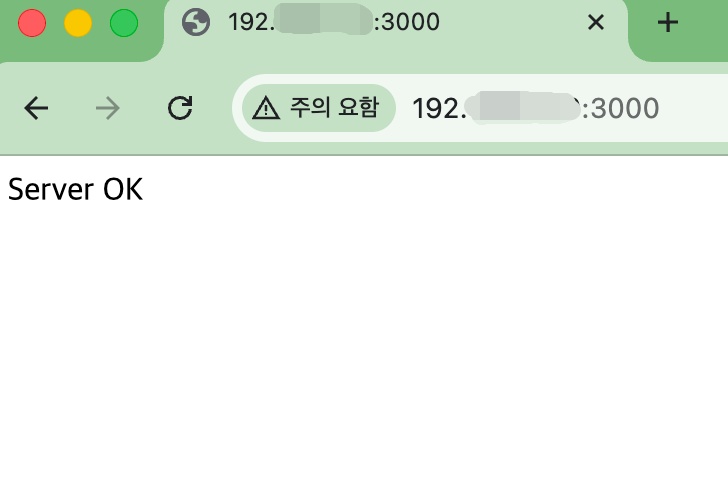
✔️ 브라우저에 http://nodejs서버주소:3000 으로 접속하면 브라우저에 메세지가 출력됩니다.
If you access http://nodejsserveraddress:3000 in your browser, a message will be displayed in the browser.
✔️ get방식으로 메세지를 전송합니다.(control?led=1)
Sends a message using the GET method.(control?led=1)
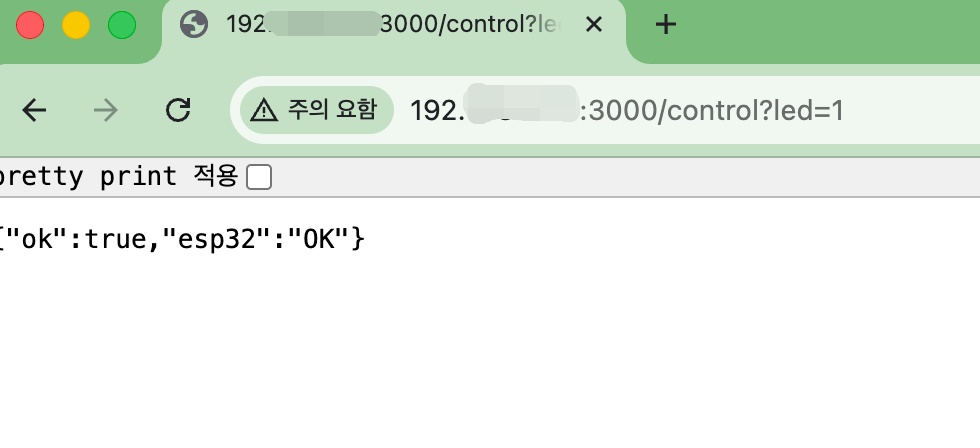
✔️ 전송된 메세지가 Esp32로 전송되는것을 확인 할 수 있습니다.
You can verify that the transmitted message is sent to the Esp32.

