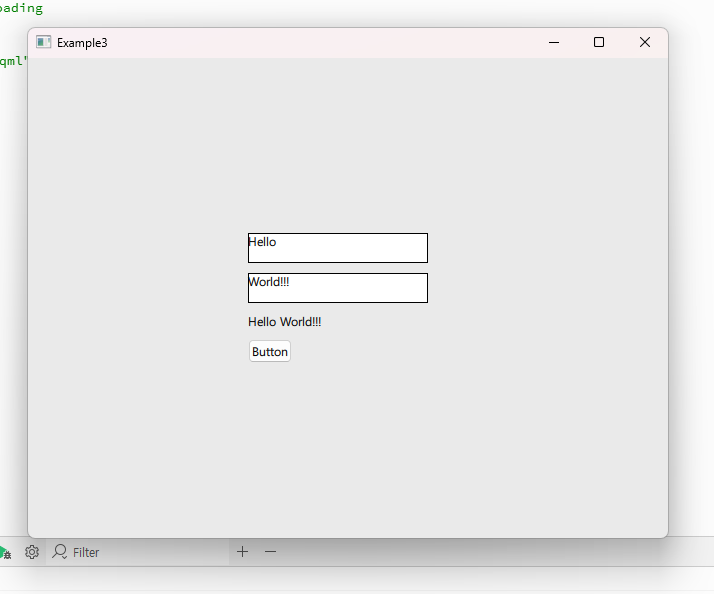
👉 QML을 통해서 입력된 내용을 직접 화면에 출력 할 수 있습니다.
You can directly display the content entered through QML on the screen.
👉 이 부분은 출력은 C++이 수행하고 C++코드를 QML에 연결하는 것에 대한 설명입니다.
This part explains how the output is done in C++ and how to connect the C++ code to QML.
📁1.프로젝트 / Project
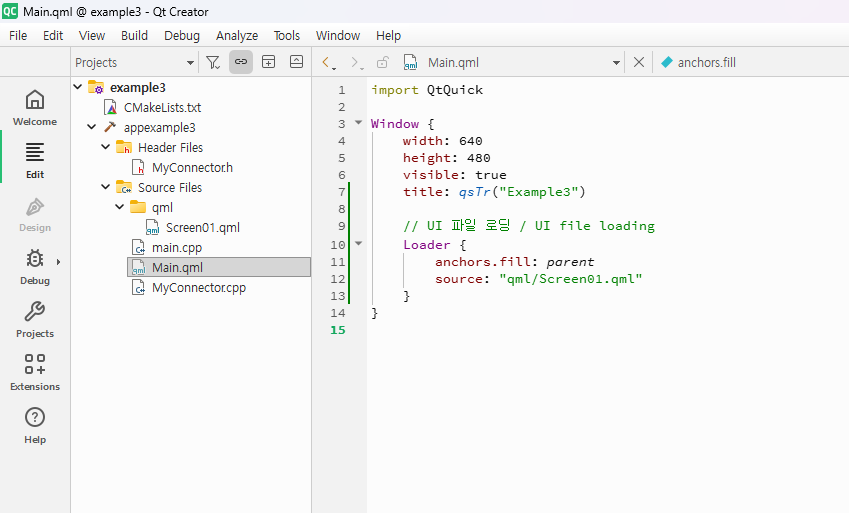
📁 2.C++ 과 qml 연결 / Connecting C++ and QML
✔️ myconnector.h와 myconnector.cpp파일에 qml에서 사용할 시그널과 함수를 설정합니다.
Define the signals and functions to be used in QML within the myconnector.h and myconnector.cpp files.
✔️ 아래의 코드는 헤더파일의 코드입니다.
The code below is from the header file.
#ifndef MYCONNECTOR_H
#define MYCONNECTOR_H

// MyConnector.h

#include <QObject>
#include <QString>

class MyConnector : public QObject {
    Q_OBJECT

public:
    explicit MyConnector(QObject *parent = nullptr);

    Q_INVOKABLE void updateText(const QString &text1, const QString &text2);

signals:
    void resultReady(const QString &result);
};

#endif // MYCONNECTOR_H
✔️ updateText는 qml(Screen01.qml)에서 아래와 같이 사용합니다.
updateText is used in QML (Screen01.qml) as shown below.
        Button {
            id: button
            text: qsTr("Button")
            // === 코드추가:클릭 이벤트 ===
            // === Add code:Click Event ===
            onClicked: myConnector.updateText(textEdit.text, textEdit2.text)

        }
✔️ QML에 객체 등록하기(C++과 QML 연결)
Registering Objects in QML (Connecting C++ and QML)
— Main.cpp에 아래처럼 myConnector클래스를 QML객체로 등록할 수 있습니다.
You can register the myConnector class as a QML object in Main.cpp as shown below.
//✅ QML에 C++ 객체를 등록하기 위해 필요
// Required to register C++ objects in QML
#include <QQmlContext>

//✅ MyConnector 클래스 선언 포함
// Include MyConnector class declaration
#include "MyConnector.h"

... 중략 / Omitted ...

MyConnector connector;
engine.rootContext()->setContextProperty("myConnector", &connector);
✔️ QML에서 사용하기 / Using in QML
— onResultReady는 myConnector라는 객체가 가진 resultReady라는 시그널(Signal) 이름 앞에 on을 붙여서 만든 시그널 핸들러(슬롯)입니다.onResultReady is a signal handler (or slot) created by prefixing “on” to the name of the resultReady signal belonging to the object named myConnector.
1)Screen01.qml(on+ResultReady)
        Connections {
            target: myConnector
            function onResultReady(result) {
                text1.text = result
            }
        }
2)Myconnector.h에 시그널 선언
Declare the signal in Myconnector.h
signals:
    void resultReady(const QString &result);
};
3)Myconnector.cpp에 시그널 발생
Signal generation in Myconnector.cpp
void MyConnector::updateText(const QString &text1, const QString &text2) {
    QString combined = text1 + " " + text2;
    emit resultReady(combined);
}📁3.코드설명 / Code Description
✔️Myconnector.h
#ifndef MYCONNECTOR_H
#define MYCONNECTOR_H

// MyConnector.h

#include <QObject>
#include <QString>

class MyConnector : public QObject {
    Q_OBJECT

public:
    explicit MyConnector(QObject *parent = nullptr);

    Q_INVOKABLE void updateText(const QString &text1, const QString &text2);

signals:
    void resultReady(const QString &result);
};

#endif // MYCONNECTOR_H
— 헤더가 다른 클래스 파일에 두번 삽입되면 컴파일 오류가 납니다.
If a header is inserted twice in different class files, a compilation error occurs.
— 위의 코드에서 아래와 같이 작성하면 중복 삽입 오류가 발생하지 않습니다.
If you write the code above as follows, a duplicate insertion error will not occur.
— 이미 헤더가 C++ 클래스 파일에 포함되어 있으면 무시합니다.
If the header is already included in the C++ class file, it is ignored.
 #ifndef MYCONNECTOR_H
 #define MYCONNECTOR_H

  코드 / CODE

 #endif // MYCONNECTOR_H
✔️qml/Screen01.qml
import QtQuick
import QtQuick.Controls


Rectangle {
    // id: rectangle
    // width: Constants.width
    // height: Constants.height

    // color: Constants.backgroundColor

    // 상수 직접 선언. / Direct declaration of constants
    property int widthConst: 1920
    property int heightConst: 1080
    property color backgroundColorConst: "#EAEAEA"

    width: widthConst
    height: heightConst
    color: backgroundColorConst

    Column {
        id: column
        width: 200
        anchors.centerIn: parent
        spacing: 10

        Rectangle {
            width: 180
            height: 30
            color: "white"
            border.color: "black"

            TextEdit {
                id: textEdit
                anchors.fill: parent
                width: 80
                height: 20
                text: qsTr("입력1/input1")
                font.pixelSize: 12
            }
        }

        Rectangle {
            width: 180
            height: 30
            color: "white"
            border.color: "black"

            TextEdit {
                id: textEdit2
                width: 80
                height: 20
                text: qsTr("입력2/input2")
                font.pixelSize: 12
            }
        }

        Text {
            id: text1
            text: qsTr("값출력/Print Value")
            font.pixelSize: 12
        }

        Button {
            id: button
            text: qsTr("Button")
            // === 코드추가:클릭 이벤트 ===
            // === Add code:Click Event ===
            onClicked: myConnector.updateText(textEdit.text, textEdit2.text)

        }
        // === 코드추가:연결 ===
        // === Add code:connection ===
        Connections {
            target: myConnector
            function onResultReady(result) {
                text1.text = result
            }
        }

    }
}
✔️ main.cpp
#include <QGuiApplication>
#include <QQmlApplicationEngine>

// QML에 C++ 객체를 등록하기 위해 필요
// Required to register C++ objects in QML
#include <QQmlContext>

// MyConnector 클래스 선언 포함
// Include MyConnector class declaration
#include "MyConnector.h"

int main(int argc, char *argv[])
{
    QGuiApplication app(argc, argv);

    QQmlApplicationEngine engine;

    QObject::connect(
        &engine,
        &QQmlApplicationEngine::objectCreationFailed,
        &app,
        []() { QCoreApplication::exit(-1); },
        Qt::QueuedConnection);

    // === 코드 추가 / Add code ===
    MyConnector connector;
    engine.rootContext()->setContextProperty("myConnector", &connector);

    // === 여기까지 / Up to here ===
    engine.loadFromModule("example3", "Main");

    return app.exec();
}
✔️ main.qml
import QtQuick

Window {
    width: 640
    height: 480
    visible: true
    title: qsTr("Example3")

    // UI 파일 로딩 / UI file loading
    Loader {
        anchors.fill: parent
        source: "qml/Screen01.qml"
    }
}
✔️ Myconnector.cpp
// MyConnector.cpp
#include "MyConnector.h"

MyConnector::MyConnector(QObject *parent) : QObject(parent) {}

void MyConnector::updateText(const QString &text1, const QString &text2) {
    QString combined = text1 + " " + text2;
    emit resultReady(combined);
}
✔️ CmakeLists.txt
✔️ 아래의 굵은 글씨가 파일 추가된 부분입니다.
The bold text below is the added portion of the file.
✔️ 바로 아래의 코드는 직접 추가한 코드 입니다.
The code right below is the code I added myself.
qml/Screen01.qml✔️바로 아래의 코드는 자동으로 수정된 내용입니다
The code directly below is automatically corrected.
✔️QT Creator의 Souce Files에서 마우스 오른쪽 클릭,Add New를 사용한 경우 자동으로 아래의 내용이 추가됩니다.
If you right-click on Source Files in QT Creator and use Add New, the following will be added automatically.
✔️여기서는 클래스 파일과 헤더파일을 추가했습니다.
Here we have added the class file and header file.
SOURCES MyConnector.h
SOURCES MyConnector.cpp
✔️ CmakeLists전체 코드 / CmakeLists Full Code
cmake_minimum_required(VERSION 3.16)

project(example3 VERSION 0.1 LANGUAGES CXX)

set(CMAKE_CXX_STANDARD_REQUIRED ON)

find_package(Qt6 REQUIRED COMPONENTS Quick)

qt_standard_project_setup(REQUIRES 6.8)

qt_add_executable(appexample3
    main.cpp
)

qt_add_qml_module(appexample3
    URI example3
    VERSION 1.0
    QML_FILES
        Main.qml
        qml/Screen01.qml
        SOURCES MyConnector.h
        SOURCES MyConnector.cpp
)

# Qt for iOS sets MACOSX_BUNDLE_GUI_IDENTIFIER automatically since Qt 6.1.
# If you are developing for iOS or macOS you should consider setting an
# explicit, fixed bundle identifier manually though.
set_target_properties(appexample3 PROPERTIES
#    MACOSX_BUNDLE_GUI_IDENTIFIER com.example.appexample3
    MACOSX_BUNDLE_BUNDLE_VERSION ${PROJECT_VERSION}
    MACOSX_BUNDLE_SHORT_VERSION_STRING ${PROJECT_VERSION_MAJOR}.${PROJECT_VERSION_MINOR}
    MACOSX_BUNDLE TRUE
    WIN32_EXECUTABLE TRUE
)

target_link_libraries(appexample3
    PRIVATE Qt6::Quick
)

include(GNUInstallDirs)
install(TARGETS appexample3
    BUNDLE DESTINATION .
    LIBRARY DESTINATION ${CMAKE_INSTALL_LIBDIR}
    RUNTIME DESTINATION ${CMAKE_INSTALL_BINDIR}
)
3.실행 / Run