👉🏻 json데이터fetch방식의 데이터 전송
Data transmission using the jsonDatafetch method
👉🏻 fetch데이터 전송방식은 웹페이지의새로 고침없이 서버 백그라운드와 데이터를 주고 받을 수 있습니다.
The fetch data transfer method allows for the exchange of data with the server in the background without refreshing the web page.
👉🏻 이 포스트에서 설명하는 소스코드는 깃허브에서 다운받을 수 있습니다.
The source code described in this post can be downloaded from GitHub.
https://github.com/gideonslife01/flm-js-nodejs
👉🏻 node_modules디렉토리를 삭제하고 업로드 했기 때문에 실행할 경우 디렉토리 내에서 npm install 명령을 한번 실행해야합니다.
Since the node_modules directory was deleted before uploading, you need to run the npm install command within the directory to execute the application.
👉🏻 모듈설치 / Install Modules
npm install body-parser cors ejs express fs👉🏻 파일 / files
— node_modules 디렉토리와 package.json,package-local.json파일은 npm install명령 실행시 자동생성됩니다.
The node_modules directory and the package.json and package-local.json files are automatically generated when the npm install command is executed.
#project directory

node_modules		package.json		server.js
package-lock.json	public
# public directory
form.ejs👉🏻 전체 코드 / full code
✔️ server.js
const ejs = require('ejs');
const express = require('express');
const http = require('http');
const path = require('path');
var bodyParser = require('body-parser');
const fs = require('fs');

const app = express();
const server = http.createServer(app);
const port = 3000;

// ejs settings
app.set('view engine','ejs');
app.set('views','./public');

// 정적 디렉토리 설정 : 웹서버 파일 경로
// Static directory configuration: Web server file path
app.use(express.static('public'));

// json데이터 사용
// Use JSON data
app.use(express.json());

// 파일 업로드용
// For file upload
//app.use(express.urlencoded({ extended: true }));

// POST메소드용 parse application/x-www-form-urlencoded
// parse application/x-www-form-urlencoded for POST method
app.use(bodyParser.urlencoded({ extended: false }));

// 폼 불러오기
// Load form
app.get('/', (req, res) => {
    res.render('form')
});

// 폼 내용 처리 또는 출력
// Process or output form content
app.post('/signupProc',(req, res) => {
    const username = req.body.username;
    console.log(`폼데이터/Form Data : ${username}`);

    if(username){
        res.json({message: '데이터전송완료\nData transmission completed.'});
    }
})


// 서버 시작
// Start server
server.listen(port, () => {
    console.log(`서버가 ${port} 포트에서 실행 중입니다.\nServer is running on port ${port}.`);
});


// module install
// npm install body-parser cors ejs express fs
✔️ /public/form.ejs
<!DOCTYPE html>
<html lang="ko">
<head>
    <meta charset="UTF-8" />
    <meta name="viewport" content="width=device-width, initial-scale=1.0"/>
    <title>FETCH FORM</title>
    <style>
        .signup-form {
            background-color: #fff;
            padding: 30px;
            border-radius: 8px;
            box-shadow: 0 0 10px rgba(0, 0, 0, 0.1);
            width: 400px;
        }
        .form-group {
            margin-bottom: 20px;
        }
        label {
            display: block;
            margin-bottom: 5px;
            font-weight: bold;
        }
        input[type="text"] {
            width: calc(100% - 80px); /* Adjust width to accommodate the button */
            padding: 10px;
            border: 1px solid #ccc;
            border-radius: 4px;
            box-sizing: border-box;
            font-size: 16px;
        }
        .input-button-wrapper {
            display: flex;
            gap: 10px; /* Space between input and button */
            align-items: center;
        }
        button { /* submit 타입 제거 / Remove the submit type. */
            background-color: #ff8787;
            color: white;
            padding: 15px 15px;
            border: none;
            border-radius: 4px;
            cursor: pointer;
            font-size: 13px;
            box-sizing: border-box;
            white-space: nowrap; /* 줄바꿈금지 / No line breaks*/
        }
        button:hover {
            background-color: #ff6b6b;
        }
        .error-message {
            color: red;
            font-size: 0.9em;
            margin-top: 5px;
        }
        .available-message {
            color: green;
            font-size: 0.9em;
            margin-top: 5px;
        }
    </style>
</head>
<body>
    <div class="signup-form">
        <form id="signupForm" name="signupForm">
            <div class="form-group">
                <label for="username">아이디/ID:</label>
                <div class="input-button-wrapper">
                    <input type="text" id="username" name="username" required minlength="3" maxlength="50" />
                    <button type="button" id="submitBtn">확인 submit</button>
                </div>
                <div id="errorMessage" class="error-message"></div>
                <div id="successMessage" class="available-message"></div>
            </div>
        </form>
    </div>
    <script>
        // id값 가져오기
        // Get the ID value
        const signupForm = document.getElementById('signupForm');
        const usernameInput = document.getElementById('username');
        const submitBtn = document.getElementById('submitBtn');
        const errorMessageDiv = document.getElementById('errorMessage');
        const successMessageDiv = document.getElementById('successMessage');

        // click이벤트
        // click event
        submitBtn.addEventListener('click', async (event) => {
            errorMessageDiv.textContent = '';
            successMessageDiv.textContent = '';
            try {
                const formData = new FormData(signupForm);
                const data = {};
                formData.forEach((value, key) => (data[key] = value));

                // fetch방식
                // fetch method
                const response = await fetch('/signupProc', {
                    method: 'POST',
                    headers: {
                        'Content-Type': 'application/json',
                    },
                    body: JSON.stringify(data),
                });

                // 서버에서json데이터 받기
                // Receive JSON data from the server
                const result = await response.json();

                if (response.ok) {
                    successMessageDiv.textContent = result.message || '회원가입이 완료되었습니다.\nSignup completed successfully.';
                    signupForm.reset();

                    // 추가 검증을 위해 이 변수가 다른 곳에 정의되어 있다고 가정합니다.
                    // Assuming you have this variable defined elsewhere for further validation
                    //isUsernameAvailable = false;

                    // 페이지 이동 완료메세지 확인되면 테스트
                    //location.href='/userlist';

                } else {
                    errorMessageDiv.textContent = result.error || '회원가입에 실패했습니다.\nSignup failed.';
                }

            } catch (error) {
                console.error('회원가입 오류/Signup Error:', error);
                errorMessageDiv.textContent = '서버와 통신 중 오류가 발생했습니다.\nError occurred while communicating with the server.';
            }
        });
    </script>
</body>
</html>
👉🏻 실행 / Run
✔️ 터미널에서 다음과 같이 서버를 실행합니다.
node server.js✔️ 브라우저에서 http://localhost:3000으로 접속합니다.
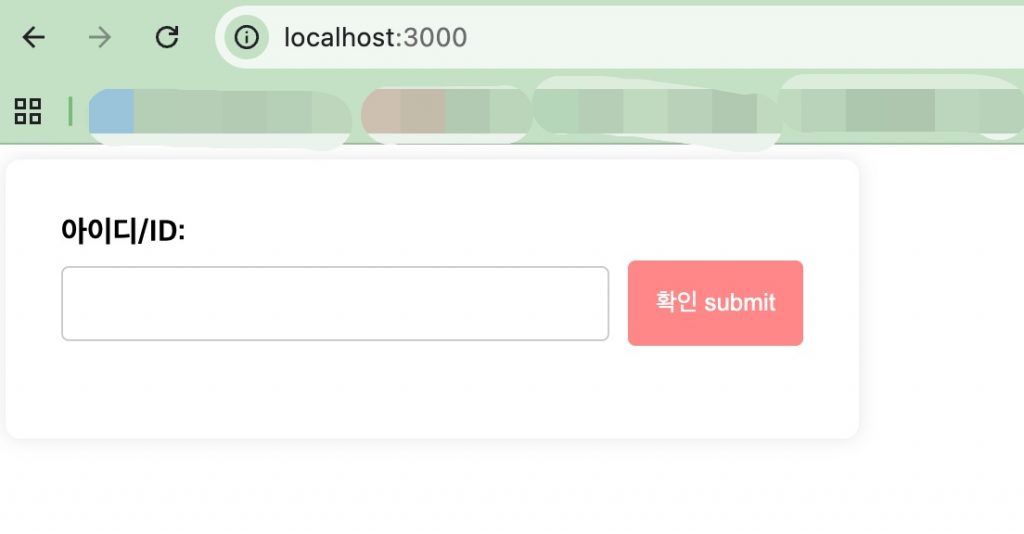
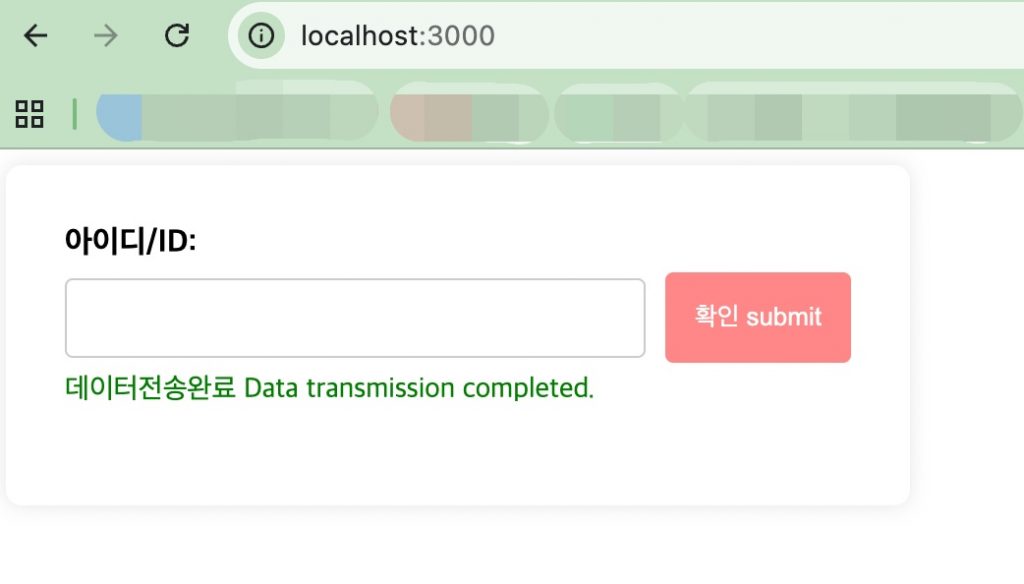
✔️ 텍스트 필드에 간단히 ‘test’라고 입력하고 ‘확인/submit’ 버튼을 누르면 결과를 확인 할 수 있습니다.
You can view the results by simply entering ‘test’ into the text field and clicking the ‘OK/Submit’ button.

✔️ ‘확인/submit’ 버튼을 누르면 동시에 서버에서 보내는 메세지를 브라우저에 출력합니다.
When you click the ‘Confirm/Submit’ button, the message sent from the server is simultaneously displayed in the browser.
👉🏻 코드 설명 / Code Explanation
✔️ 여기서 중요한 점은 fetch를 사용해서 어떻게 터미널(서버 백그라운드)과 연동되는건지가 가장 중요합니다.
The crucial point here is understanding how fetch is used to interface with the terminal (server background).
✔️ server.js
— 브라우저에서 http://localhost:3000을 실행시 public디렉토리 내의 form.ejs파일을 불러 옵니다.
When you run http://localhost:3000 in your browser, the form.ejs file located in the public directory is loaded.
app.get('/', (req, res) => {
    res.render('form')
});
— 버튼을 누를 경우 form.ejs의 자바스크립트에서 fetch를 사용해서 백그라운드로 데이터가 전송됩니다.
When the button is clicked, data is sent to the background using fetch within the JavaScript in form.ejs.
app.post('/signupProc',(req, res) => {
    const username = req.body.username;
    console.log(`폼데이터/Form Data : ${username}`);

    if(username){
        res.json({message: '데이터전송완료\nData transmission completed.'});
    }
})
1) fetch를 사용하는 form.ejs의 자바스크립트 부분은 아래와 같습니다.
The JavaScript section of form.ejs that uses fetch is as follows.
const response = await fetch('/signupProc', {
      method: 'POST',
      headers: {
      'Content-Type': 'application/json',
      },
      body: JSON.stringify(data),
});
2)백그라운드로 전송된 데이터가 있으면 터미널에 console.log와 res.json으로 출력합니다.
If data is sent in the background, it is output to the terminal using console.log and res.json.
— server.js에서 res.json으로 출력되면 json데이터를 가져와서 form.ejs의 <div>태그에 출력합니다.
When the output from server.js is sent via res.json, the JSON data is retrieved and displayed within the <div> tag in form.ejs.
1)html 부분(화면에 표시될 영역)
HTML section (the area displayed on the screen)
<div id="errorMessage" class="error-message"></div>
<div id="successMessage" class="available-message"></div>
2)자바스크립트 부분(화면 메세지 표시되도록 동작 지시)
JavaScript section (instructions to display messages on the screen)
const errorMessageDiv = document.getElementById('errorMessage');
const successMessageDiv = document.getElementById('successMessage');

... 중략 / omitted ...

// 서버에서json데이터 받기
// Receive JSON data from the server
const result = await response.json();

if (response.ok) {
   successMessageDiv.textContent = result.message || '회원가입이 완료되었습니다.\nSignup completed successfully.';
   signupForm.reset();

    // 추가 검증을 위해 이 변수가 다른 곳에 정의되어 있다고 가정합니다.
    // Assuming you have this variable defined elsewhere for further validation
    //isUsernameAvailable = false;

    // 페이지 이동 완료메세지 확인되면 테스트
    //location.href='/userlist';

} else {
    errorMessageDiv.textContent = result.error || '회원가입에 실패했습니다.\nSignup failed.';
}