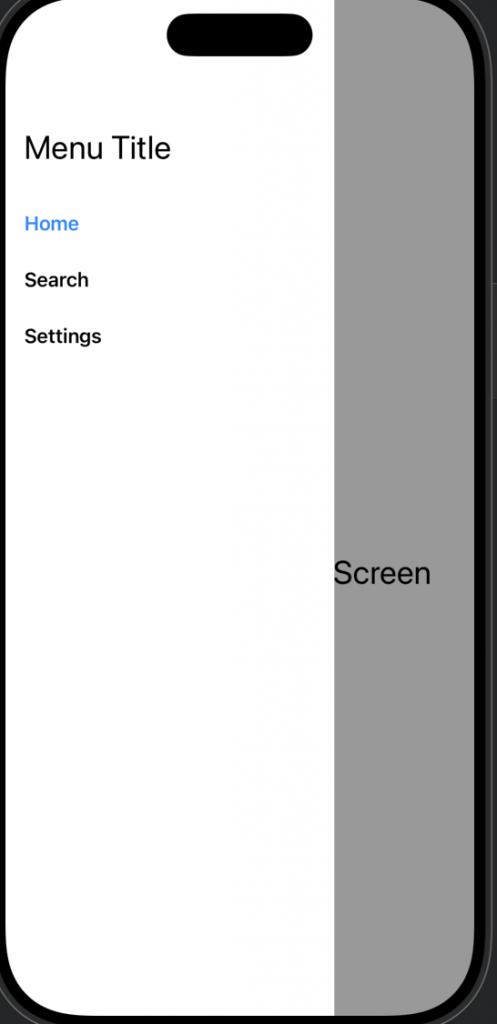
👉🏻 Drawer Menu를 swift에서 구현하는 방법입니다
How to implement a Drawer Menu in Swift
👉🏻 Drawer Menu의 핵심은 애니메이션 속성을 사용해서 메뉴 위치를 이동하는 것입니다.
The key to the Drawer Menu is using animation properties to move the menu position.
✔️ContentView.swift
import SwiftUI

struct ContentView: View {
    @State private var showMenu = false
    @State private var selectedMenu = "Home"
    @State private var hideStatusBar = false

    var body: some View {
        ZStack {
            // Main content
            NavigationView {
                VStack {
                    switch selectedMenu {
                    case "Home":
                        HomeScreen()
                       // HomeScreen2()
                    case "Search":
                        SearchScreen()
                       // SearchScreen2()
                    case "Settings":
                        SettingsScreen()
                       // SettingsScreen2()
                    default:
                        HomeScreen()
                    }
                }
                .navigationBarTitle(Text(selectedMenu), displayMode: .inline)
                .navigationBarItems(leading: Button(action: {
                    withAnimation(.easeInOut(duration: 0.3)) {
                        showMenu.toggle()
                    }
                }) {
                    Image(systemName: "line.3.horizontal")
                        .imageScale(.large)
                })
            }
            .disabled(showMenu)

            // 반투명 배경 (항상 존재 + opacity로 제어)
            // Semi-transparent background (always present + controlled by opacity)
            Color.black
                .opacity(showMenu ? 0.4 : 0.0)
                .animation(.easeInOut(duration: 0.3), value: showMenu)
                .edgesIgnoringSafeArea(.all)
                .ignoresSafeArea() //  Status Bar 포함
                .edgesIgnoringSafeArea(.all) // Status Bar 포함(ios15이전 용)
                .onTapGesture {
                    if showMenu {
                        withAnimation(.easeInOut(duration: 0.3)) {
                            showMenu = false
                        }
                    }
                }

            // Drawer (offset으로 슬라이드 인/아웃)
            // Drawer (slides in/out with offset)

            // Drawer는 Dynamick Island는 가릴 수 없음(시계 우측 타원)
            // Drawer cannot cover Dynamick Island (oval on the right side of the clock)
            HStack {

                // 화면의정보 계산할때 GeometryReader사용
                // Use GeometryReader when calculating screen information
                GeometryReader { geo in
                    VStack(alignment: .leading) {
                        Text("Menu Title")
                            .font(.title)
                            .padding(.top, 50)
                            .padding(.bottom, 20)

                        // 각 메뉴 / Each Menu
                        DrawerMenuItem(title: "Home", selectedMenu: $selectedMenu, showMenu: $showMenu)
                        DrawerMenuItem(title: "Search", selectedMenu: $selectedMenu, showMenu: $showMenu)
                        DrawerMenuItem(title: "Settings", selectedMenu: $selectedMenu, showMenu: $showMenu)
                        Spacer() // 나머지 공간 차지 / Takes up the rest of the space

                    } // VStack
                    //.frame(width: 250, height: UIScreen.main.bounds.height) // 화면전체 높이로 설정 / Set to full screen height(deprecated)
                    .frame(width:250, height:geo.size.height) // 드로어를 전체 높이로설정,geometry reader사용 / Set the drawer to full height, using the geometry reader
                    .padding(.horizontal, 16)
                    .background(Color(UIColor.systemBackground))
                }


                Spacer()
            } // HStack(Drawer)
            .offset(x: showMenu ? 0 : -260) // 스택위치 0은 화면 안 -260화면 밖 / Stack position 0 is inside the screen -260 is outside the screen
            .animation(.easeInOut(duration: 0.3), value: showMenu) // 에니메이션적용 / Apply animation

            /*
                 animation을 지정하지않고 offset만 지정해도 ios에서는 암묵적으로 애니메이션 처리함
                 animation을 있으면 더 자세한 설정이 가능함.
                 Even if you only specify an offset without specifying animation, iOS implicitly handles animation.
                 Animation allows for more detailed settings.
             */


        }
        .statusBar(hidden: hideStatusBar) // Drawer열릴 경우 Statusbar숨김 / Hide Statusbar when Drawer is opened
        .onChange(of: showMenu) { oldValue, newValue in
            hideStatusBar = newValue
        }


        //zstack
    } // body
} //ContentView

// MARK: - DrawerMenuItem
struct DrawerMenuItem: View {
    let title: String //Home,Search,Settings
    @Binding var selectedMenu: String // Default value "Home"
    @Binding var showMenu: Bool // true,false
    /**
           @Binding :  부모뷰의 상태(@State)를 자식뷰가  수정 할 수 있게 연결해주는 참조 ,c++의 포인터와 같은 개념
     */

    var body: some View {
        Button(action: {
            withAnimation(.easeInOut(duration: 0.3)) {
                // 메뉴타이틀 변경(파라메터로 입력된 값을 대입) / Change menu title (substitute the value entered as a parameter)
                selectedMenu = title
                showMenu = false // Close Drawer
            }
        }) {
            HStack {
                Text(title) // Home,Search,Settings
                    .font(.headline)
                    .foregroundColor(selectedMenu == title ? .blue : .primary)
                Spacer()
            }
            .padding(.vertical, 10)
        }
    }
}

// MARK: - Screens(로컬/local)
struct HomeScreen: View {
    var body: some View {
    Text("로컬화면/Local screen.")
    Text("홈 화면입니다./Home Screen").font(.title).padding()
    }
}
struct SearchScreen: View {
    var body: some View {
        Text("로컬화면./ Local Screen")
        Text("검색 화면입니다. / Search Screen").font(.title).padding()
    }
}
struct SettingsScreen: View {
    var body: some View {
        Text("로컬화면. / Local Screen")
        Text("설정 화면입니다. / Settings Screen").font(.title).padding()
    }
}

// MARK: - Preview
#Preview {
    ContentView()
}
✔️ScreenShot