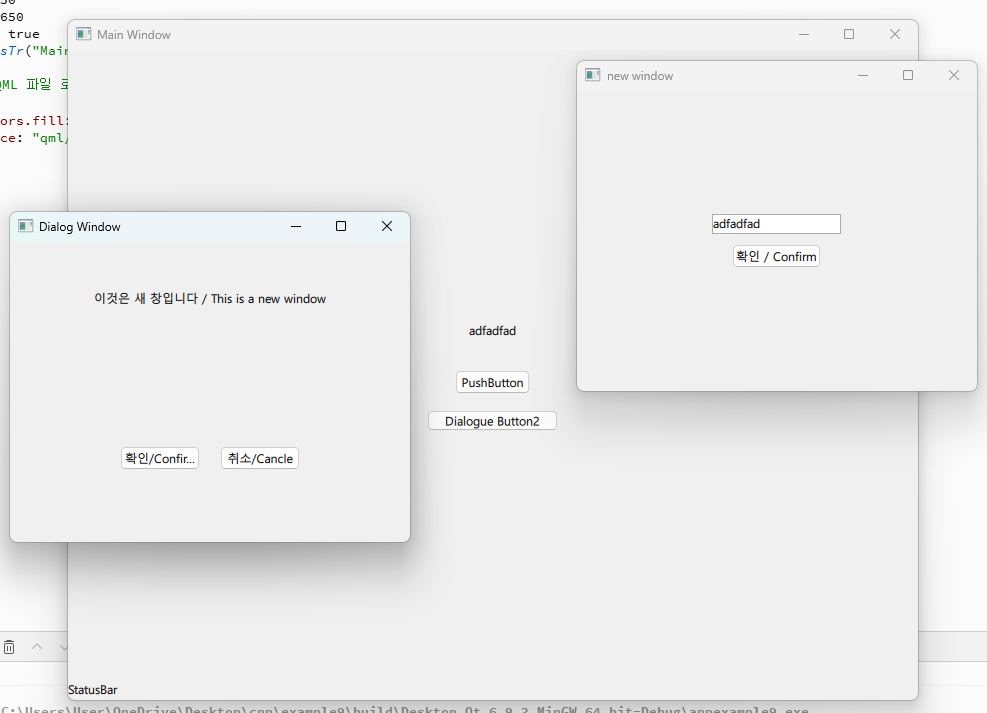
👉 버튼 클릭시 다이얼로그 창과 새로운 창을 오픈합니다.
When you click the button, a dialog window and a new window open.
👉 새로운 창에서 텍스트 입력하고 버튼 클릭시 mainwindow의 라벨에 텍스트가 출력됩니다.
Enter text in a new window and click the button to display the text in the label of the mainwindow.
👉 새로운창과 이전 창 사이의 변수 전달은 시그널과 슬롯을 사용합니다.
Passing variables between new and old windows uses signals and slots.
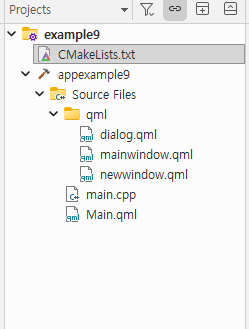
Project WIndow
1.CMakeLists.txt
cmake_minimum_required(VERSION 3.16)

project(example9 VERSION 0.1 LANGUAGES CXX)

set(CMAKE_CXX_STANDARD_REQUIRED ON)

find_package(Qt6 REQUIRED COMPONENTS Quick)

qt_standard_project_setup(REQUIRES 6.8)

qt_add_executable(appexample9
    main.cpp
)
#-- qml 파일 추가 / Add qml files --
qt_add_qml_module(appexample9
    URI example9
    VERSION 1.0
    QML_FILES
        Main.qml
        qml/mainwindow.qml
        qml/dialog.qml
        qml/newwindow.qml
)

# Qt for iOS sets MACOSX_BUNDLE_GUI_IDENTIFIER automatically since Qt 6.1.
# If you are developing for iOS or macOS you should consider setting an
# explicit, fixed bundle identifier manually though.
set_target_properties(appexample9 PROPERTIES
#    MACOSX_BUNDLE_GUI_IDENTIFIER com.example.appexample9
    MACOSX_BUNDLE_BUNDLE_VERSION ${PROJECT_VERSION}
    MACOSX_BUNDLE_SHORT_VERSION_STRING ${PROJECT_VERSION_MAJOR}.${PROJECT_VERSION_MINOR}
    MACOSX_BUNDLE TRUE
    WIN32_EXECUTABLE TRUE
)

target_link_libraries(appexample9
    PRIVATE Qt6::Quick
)

include(GNUInstallDirs)
install(TARGETS appexample9
    BUNDLE DESTINATION .
    LIBRARY DESTINATION ${CMAKE_INSTALL_LIBDIR}
    RUNTIME DESTINATION ${CMAKE_INSTALL_BINDIR}
)
2.qml/dialog.qml
// dialog.qml
import QtQuick 2.15
import QtQuick.Controls 2.15
import QtQuick.Layouts 1.15

Window {
    id: dialogWindow
    width: 400
    height: 300
    title: "Dialog Window"
    visible: false
    modality: Qt.ApplicationModal // 모달처럼 동작 / behaves like a modal
    Rectangle {
        anchors.fill: parent
        color: "#f0f0f0" // 배경 색상 / background color


        ColumnLayout {
            anchors.fill: parent
            spacing: 20
            //padding: 20

            Label {
                text: "이것은 새 창입니다 / This is a new window"
                horizontalAlignment: Text.AlignHCenter
                Layout.alignment: Qt.AlignHCenter
            }
            RowLayout {
                Layout.alignment: Qt.AlignHCenter
                spacing: 20

                Button {
                    text: "확인/Confirm"
                    Layout.preferredWidth: 80
                    onClicked: dialogWindow.close()
                }

                Button {
                    text: "취소/Cancle"
                    Layout.preferredWidth: 80
                    onClicked: dialogWindow.close()
                }
            }

        }
    }
}
3.qml/mainwindow.qml
import QtQuick 2.15
import QtQuick.Controls 2.15
import QtQuick.Layouts 1.15


    // 중앙 위젯 / Central Widget
    Rectangle {
        anchors.fill: parent
        color: "#f0f0f0"

        // 텍스트 라벨 / Text Label
        Label {
            id: label
            text: "TextLabel"
            width: 221
            height: 20
            anchors.horizontalCenter: parent.horizontalCenter
            anchors.top: parent.top
            anchors.topMargin: 270
            horizontalAlignment: Text.AlignHCenter
            verticalAlignment: Text.AlignVCenter
        }

        // 첫 번째 버튼 / First Button
        Button {
            id: pushButton
            text: "PushButton"
            width: 75
            height: 24
            anchors.horizontalCenter: parent.horizontalCenter
            anchors.top: label.bottom
            anchors.topMargin: 30

            onClicked: {
                var component = Qt.createComponent("newwindow.qml")
                if (component.status === Component.Ready) {

                    //== 슬롯/Slot ==
                    var newWindowInstance = component.createObject(pushButton)
                    newWindowInstance.textSubmitted.connect(function(text) {
                        label.text = text
                        console.log = "Slot"
                    })
                    //====

                    newWindowInstance.visible = true
                } else {
                    console.error("새 창을 로드할 수 없습니다./The new window cannot be loaded.")
                }
            }

        }

        // 두 번째 버튼 / Second Button
        Button {
            id: pushButton2
            text: "Dialogue Button2"
            width: 131
            height: 21
            anchors.horizontalCenter: parent.horizontalCenter
            anchors.top: pushButton.bottom
            anchors.topMargin: 16

            onClicked: {
                var component = Qt.createComponent("dialog.qml")
                if (component.status === Component.Ready) {
                    var dialogInstance = component.createObject(pushButton2)
                    dialogInstance.visible = true


                } else {
                    console.error("Dialog component failed to load")
                }
            }

        }

        // 상태바 (QML에서는 기본적으로 제공되지는 않지만, 아래처럼 구현 가능)
        // Status bar (not provided by default in QML, but can be implemented as shown below)
        ToolBar {
            height: 22
            width: parent.width
            anchors.bottom: parent.bottom

            RowLayout {
                anchors.fill: parent
                Label {
                    text: "StatusBar"
                    Layout.alignment: Qt.AlignLeft
                }
            }
        }
    }
4.qml/newwindow.qml
import QtQuick 2.15
import QtQuick.Controls 2.15
import QtQuick.Layouts 1.15

Window {
    id: newWindow
    width: 400
    height: 300
    visible: true
    title: "new window"

    // 라벨에 출력하기 위한 시그널 정의
    // Define a signal to output to the label
    signal textSubmitted(string text)
    Rectangle {
        anchors.fill: parent
        color: "#f0f0f0" // 배경컬러 / Background Color

        ColumnLayout {
            anchors.centerIn: parent
            spacing: 10

            TextField {
                id: inputField
                placeholderText: "텍스트를 입력하세요 / Enter text"
                Layout.fillWidth: true
            }

            Button {
                id: confirmButton
                text: "확인 / Confirm"
                Layout.alignment: Qt.AlignHCenter

                onClicked: {

                    // 콘솔에 출력
                    // output to console
                    console.log("입력된 텍스트 / Entered Text:", inputField.text)

                    //시그널 발생
                    //Signal generation
                    textSubmitted(inputField.text)

                    // 창 닫기 원할 경우 / If you want to close the window : newWindow.close()

                }
            }
        }
    }
}
5.main.cpp
#include <QGuiApplication>
#include <QQmlApplicationEngine>

int main(int argc, char *argv[])
{
    QGuiApplication app(argc, argv);

    QQmlApplicationEngine engine;
    QObject::connect(
        &engine,
        &QQmlApplicationEngine::objectCreationFailed,
        &app,
        []() { QCoreApplication::exit(-1); },
        Qt::QueuedConnection);
    engine.loadFromModule("example9", "Main");

    return app.exec();
}
6.Main.qml
import QtQuick

Window {
    width: 850
    height: 650
    visible: true
    title: qsTr("Main Window")

    // 로컬 QML 파일 로드 / Local QML file load
    Loader {
        anchors.fill: parent
        source: "qml/mainwindow.qml"
    }
}
7.실행 / Run