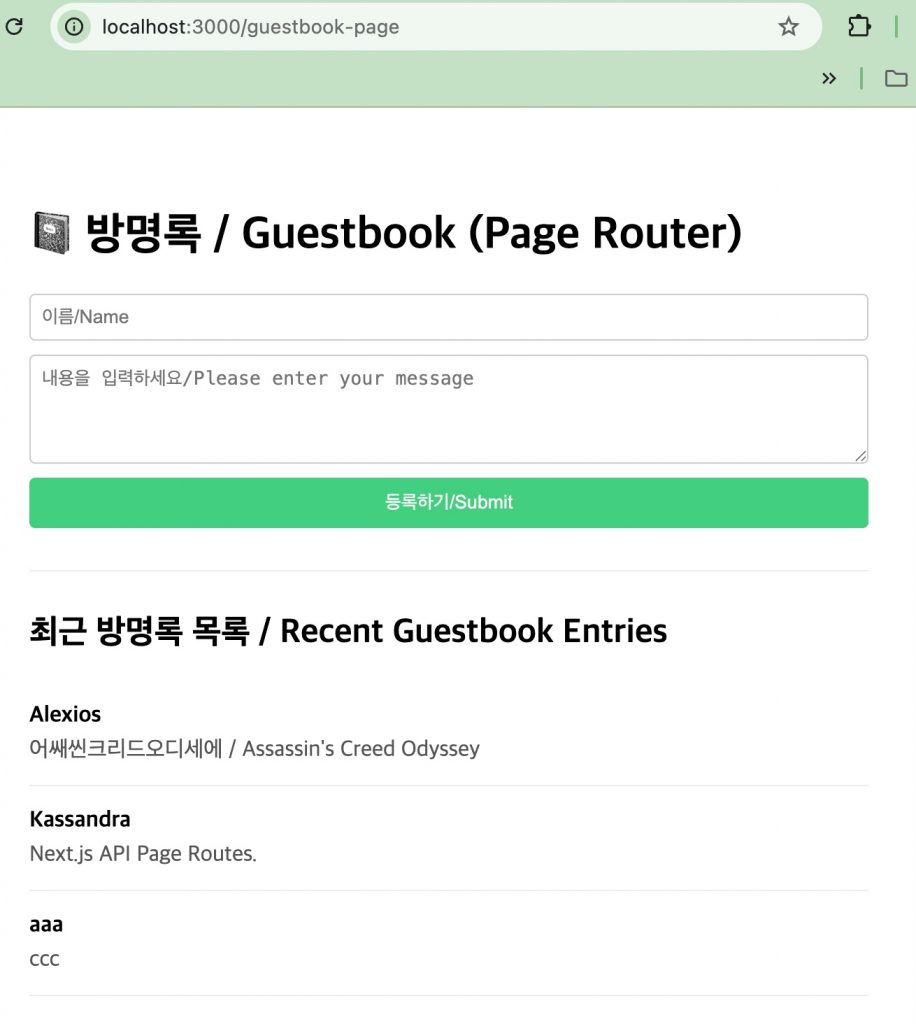
👉🏻App Route와 Page Route를 이해하기 위해서 데이터베이스 없는 간단한 방명록을 만들어 봅니다.
To understand App Routes and Page Routes, we will build a simple guestbook without a database.
👉🏻 입력되는 값은 배열에 저장됩니다.
The input values are stored in an array.
📁 프로젝트 생성
Create Project
npx create-next-app@latest📁 API 만들기 / Creating an API
▷ Next.js는 확장자가 .js, .ts, .jsx, .tsx인 것들을 모두 동일하게 route 파일로 인식합니다.
Next.js treats files with the extensions .js, .ts, .jsx, and .tsx equally as route files.
▷ tsx나 jsx를 사용해도 문제가 없지만 HTML이나 JSX를 사용할때 X가 붙습니다.
There is no issue with using TSX or JSX, but the “X” is included when using HTML or JSX.
▷ JSX는 자바스크립트 객체를 태그형으로 만든 것입니다.
JSX is a tag-like representation of JavaScript objects.
▷ 전체 디렉토리 구조
Overall directory structure
myapp3/
├── app/                        # 1.앱라우트 / App Router
│   ├── api/                    # 1)백엔드 API / BackEnd API
│   │   └── guestbookse/
│   │       └── route.js        # App Router API : /api/guestbookse
│   ├── guestbookse/            # 2)프론트 앤드 / FrontEnd
│   │   └── page.tsx            # App Router Front: /guestbookse
│   ├── favicon.ico
│   ├── globals.css
│   ├── layout.tsx
│   └── page.tsx                # 메인 홈 / Main Home: /
│
└── pages/                      # 1.페이지라우터 / Pages Router
    ├── api/
    │   └── guestbook.js        # 1)백엔드 API / BackEnd API: /api/guestbook
    └── guestbook-page.js       # 2)프론트 앤드 / FrontEnd: /guestbook-page
✔️App Route방식(최신방식)
App Router approach (latest method)
— project/app 디렉토리 안에 다음 처럼 디렉토리와 파일을 만듭니다.
Create the following directories and files inside the project/app directory.
myapp3/
└── app/                        # 1.앱라우트 / App Router
    ├── api/                    # 1)백엔드 API / BackEnd API
    │   └── guestbookapp/
    │       └── route.js        # App Router API : /api/guestbookse
    └── guestbookapp/            # 2)프론트 앤드 / FrontEnd
        └── page.tsx            # App Router Front: /guestbookse
— route.js파일에 다음 코드를 작성합니다.
Write the following code in the route.js file.
import { NextResponse } from 'next/server';

const guestbookData = [
  { id: 1, name: '2B', content: '니어오토마타 / Nier:Automata' },
  { id: 2, name: '9S', content: 'Next.js API App Routes.' },
];

// GET 요청 처리 (데이터 조회)
// Handle GET requests (data retrieval)
export async function GET() {
  return NextResponse.json(guestbookData);
}

// POST 요청 처리 (데이터 등록)
// Handle POST requests (data registration)
export async function POST(request) {
  const body = await request.json();
  const { name, content } = body;

  if (!name || !content) {
    return NextResponse.json({ message: '이름과 내용을 입력해주세요. / Please enter both name and content.' }, { status: 400 });
  }

  const newPost = {
    id: Date.now(),
    name,
    content,
  };

  guestbookData.push(newPost);
  return NextResponse.json(newPost, { status: 201 });
}
— 서버를 실행하고 API를 테스트합니다.
Run the server and test the API.
# 터미널에서 서버 실행 / Run the server in the terminal
npm run dev

# 브라우저에서 아래 주소로 접속하기 / Access the address below in your browser.
http://localhost:3000/api/guestbookapp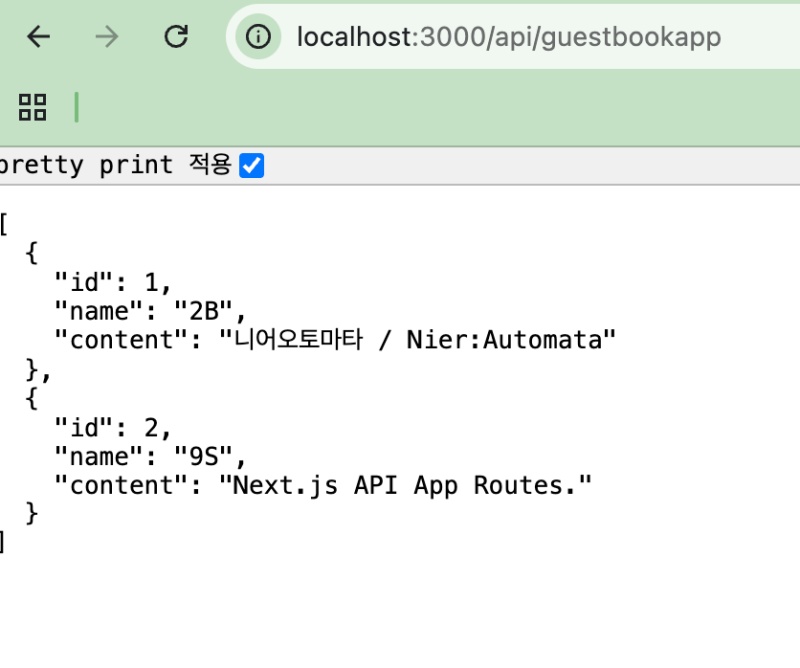
— page.tsx파일에 다음 코드를 작성합니다.
Write the following code in the page.tsx file.
"use client";

import { useEffect, useState } from "react";

// 방명록 데이터의 타입 정의
// Define the type for guestbook data
interface GuestbookItem {
  id: number;
  name: string;
  content: string;
}

export default function GuestbookPage() {

  // 상태(State) 정의
  // Define state
  const [posts, setPosts] = useState<GuestbookItem[]>([]);
  const [name, setName] = useState("");
  const [content, setContent] = useState("");
  const [isLoading, setIsLoading] = useState(true);

  // API에서 방명록 목록 가져오는 함수 (GET)
  // Function to fetch guestbook entries from the API (GET)
  const fetchPosts = async () => {
    try {
      const response = await fetch("/api/guestbookapp");
      if (!response.ok) throw new Error("데이터를 가져오는데 실패했습니다. / Failed to fetch data.");
      const data = await response.json();
      setPosts(data);
    } catch (error) {
      console.error(error);
    } finally {
      setIsLoading(false);
    }
  };

  // 페이지가 처음 켜질 때 API 호출하기
  // Call the API when the page first loads
  useEffect(() => {
    fetchPosts();
  }, []);

  // 새 방명록 등록하는 함수 (POST)
  // Function to register a new guestbook entry (POST)
  const handleSubmit = async (e: React.FormEvent) => {
    e.preventDefault(); // 새로고침 방지 / Prevent page refresh

    if (!name.trim() || !content.trim()) {
      alert("이름과 내용을 모두 입력해 주세요./Please enter both name and content.");
      return;
    }

    try {
      const response = await fetch("/api/guestbookapp", {
        method: "POST",
        headers: { "Content-Type": "application/json" },
        body: JSON.stringify({ name, content }),
      });

      if (response.ok) {
        // 등록 성공 시 입력창을 비우고 목록 새로고침
        // If registration is successful, clear the input fields and refresh the list
        setName("");
        setContent("");
        fetchPosts();
      } else {
        alert("등록에 실패했습니다./Failed to register the entry.");
      }
    } catch (error) {
      console.error(error);
    }
  };

  return (
    <div className="p-10 max-w-[600px] mx-auto font-sans">
      <h1 className="text-3xl font-bold">📓 방명록 / Guestbook (App Router)</h1>

      {/* 방명록 입력 폼 / Guestbook Entry Form */}
      <form onSubmit={handleSubmit} style={{ display: "flex", flexDirection: "column", gap: "10px", margin: "20px 0" }}>
        <input
          type="text"
          placeholder="이름/Name"
          value={name}
          onChange={(e) => setName(e.target.value)}
          style={{ padding: "8px", border: "1px solid #ccc", borderRadius: "4px" }}
        />
        <textarea
          placeholder="내용을 입력하세요/Please enter your message"
          value={content}
          onChange={(e) => setContent(e.target.value)}
          style={{ padding: "8px", border: "1px solid #ccc", borderRadius: "4px", minHeight: "8px" }}
        />
        <button type="submit" style={{ padding: "10px", backgroundColor: "#dcd809", color: "white", border: "none", borderRadius: "4px", cursor: "pointer" }}>
          등록하기/Submit
        </button>
      </form>

      <hr style={{ margin: "30px 0", border: "0", borderTop: "1px solid #eee" }} />

      {/* 방명록 목록 출력 / Guestbook Entry List */}
      <h2 className="text-2xl font-bold text-gray-800">최근 방명록 목록 / Recent Guestbook Entries</h2>
      {isLoading ? (
        <p>로딩 중/Loading...</p>
      ) : posts.length === 0 ? (
        <p>작성된 방명록이 없습니다. 첫 글을 남겨보세요! / There are no guestbook entries yet. Be the first to leave a message!</p>
      ) : (
        <ul style={{ listStyle: "none", padding: 0 }}>
          {posts.map((post) => (
            <li key={post.id} style={{ borderBottom: "1px solid #eee", padding: "15px 0" }}>
              <strong>{post.name}</strong>
              <p style={{ margin: "5px 0 0 0", color: "#555" }}>{post.content}</p>
            </li>
          ))}
        </ul>
      )}
    </div>
  );
}
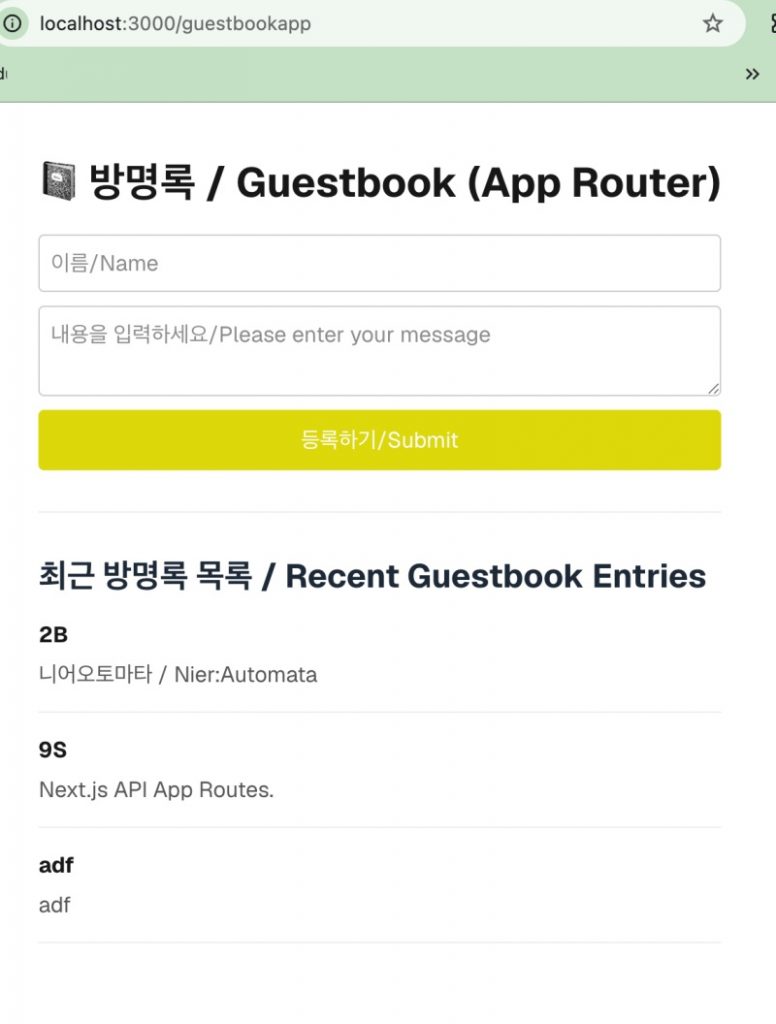
— 브라우저에 접속해서 방명록을 테스트 해봅니다.
Access the browser and test the guestbook.
✔️ Page Route방식(기존방식)
Page Routing Method (Conventional Method)
— 프로젝트 루트에 pages와 api디렉토리를 만듭니다.
Create pages and api directories in the project root.
myapp3/
└── pages/                      # 1.페이지라우터 / Pages Router
    ├── api/
    │   └── guestbook.js        # 1)백엔드 API / BackEnd API: /api/guestbook
    └── guestbook-page.js       # 2)프론트 앤드 / FrontEnd: /guestbook-page
— guestbook.js파일에 다음 코드를 작성합니다.
Write the following code in the guestbook.js file.
// 서버가 켜져 있는 동안 유지되는 임시 데이터 저장소
// Temporary data storage that persists while the server is running
const guestbookData = [
  { id: 1, name: 'Alexios', content: '어쌔씬크리드오디세에 / Assassin\'s Creed Odyssey' },
  { id: 2, name: 'Kassandra', content: 'Next.js API Page Routes.' },
];

export default function handler(req, res) {
  // GET 요청 처리 (데이터 조회)
  // Handle GET requests (data retrieval)
  if (req.method === 'GET') {
    return res.status(200).json(guestbookData);
  }

  // POST 요청 처리 (데이터 등록)
  // Handle POST requests (data registration)
  if (req.method === 'POST') {
    const { name, content } = req.body;

    if (!name || !content) {
      return res.status(400).json({ message: '이름과 내용을 입력해주세요. / Please enter both name and content.' });
    }

    const newPost = {
      id: Date.now(),
      name,
      content,
    };

    guestbookData.push(newPost);
    return res.status(201).json(newPost);
  }

  // 3. 지원하지 않는 메서드 처리
  // Handle unsupported methods
  res.setHeader('Allow', ['GET', 'POST']);
  return res.status(405).end(`Method ${req.method} Not Allowed`);
}
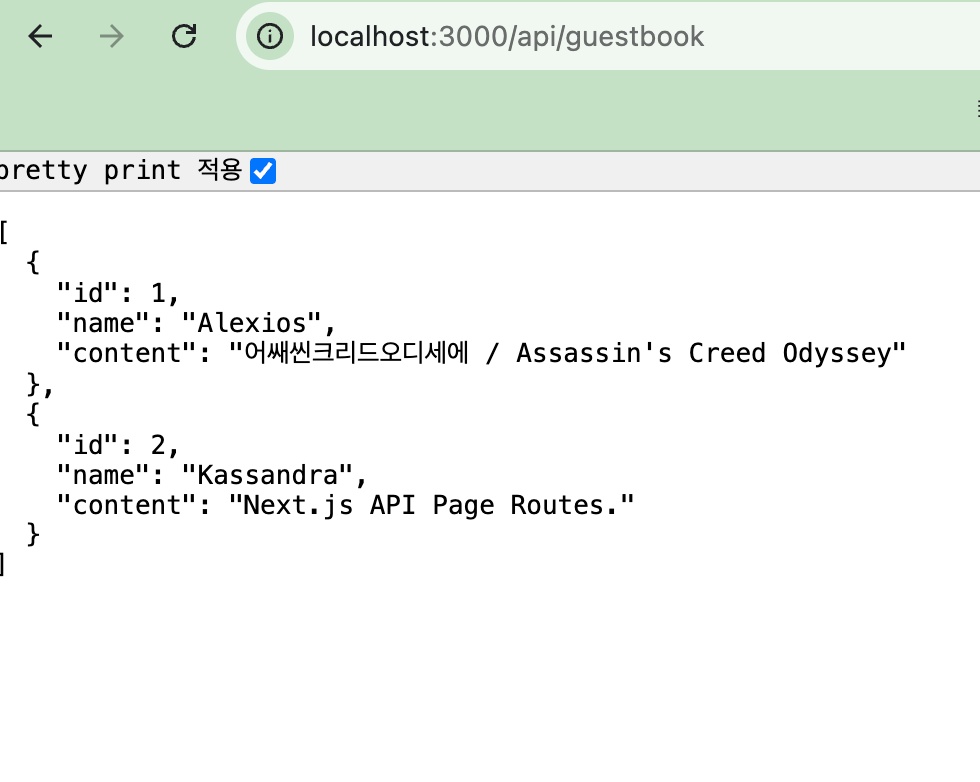
— 서버를 실행하고 API를 테스트합니다.
Run the server and test the API.
# 터미널에서 서버 실행 / Run the server in the terminal
npm run dev

# 브라우저에서 아래 주소로 접속하기 / Access the address below in your browser.
http://localhost:3000/api/guestbookapp
— guestbook-page.js파일에 다음 코드를 작성합니다.
Write the following code in the guestbook-page.js file.
import { useEffect, useState } from "react";

export default function GuestbookPage() {

  // 상태(State) 정의
  // Define state
  const [posts, setPosts] = useState([]);
  const [name, setName] = useState("");
  const [content, setContent] = useState("");
  const [isLoading, setIsLoading] = useState(true);

  // Pages Router API에서 데이터 가져오기 (GET)
  // Fetch data from the Pages Router API (GET)
  const fetchPosts = async () => {
    try {
      // 방금 만든 "pages/api/guestbook" 주소
      // The address of the newly created "pages/api/guestbook"
      const response = await fetch("/api/guestbook");
      if (!response.ok) throw new Error("데이터 수신 실패 / Failed to receive data.");
      const data = await response.json();
      setPosts(data);
    } catch (error) {
      console.error(error);
    } finally {
      setIsLoading(false);
    }
  };

  useEffect(() => {
    fetchPosts();
  }, []);

  // 새 방명록 등록하기 (POST)
  // Register a new guestbook entry
  const handleSubmit = async (e) => {
    e.preventDefault();

    if (!name.trim() || !content.trim()) {
      alert("이름과 내용을 입력해 주세요. / Please enter both name and content.");
      return;
    }

    try {
      const response = await fetch("/api/guestbook", {
        method: "POST",
        headers: { "Content-Type": "application/json" },
        body: JSON.stringify({ name, content }),
      });

      if (response.ok) {
        setName("");
        setContent("");
        fetchPosts(); // 등록 후 목록 새로고침 / Refresh the list after registration
      } else {
        alert("등록 실패");
      }
    } catch (error) {
      console.error(error);
    }
  };

  return (
    <div style={{ padding: "40px", maxWidth: "600px", margin: "0 auto", fontFamily: "sans-serif" }}>
      <h1>📓 방명록 / Guestbook (Page Router)</h1>

      <form onSubmit={handleSubmit} style={{ display: "flex", flexDirection: "column", gap: "10px", margin: "20px 0" }}>
        <input
          type="text"
          placeholder="이름/Name"
          value={name}
          onChange={(e) => setName(e.target.value)}
          style={{ padding: "8px", border: "1px solid #ccc", borderRadius: "4px" }}
        />
        <textarea
          placeholder="내용을 입력하세요/Please enter your message"
          value={content}
          onChange={(e) => setContent(e.target.value)}
          style={{ padding: "8px", border: "1px solid #ccc", borderRadius: "4px", minHeight: "60px" }}
        />
        <button type="submit" style={{ padding: "10px", backgroundColor: "#40d080", color: "white", border: "none", borderRadius: "4px", cursor: "pointer" }}>
          등록하기/Submit
        </button>
      </form>

      <hr style={{ margin: "30px 0", border: "0", borderTop: "1px solid #eee" }} />

      <h2 >최근 방명록 목록 / Recent Guestbook Entries</h2>
      {isLoading ? (
        <p>로딩 중 / Loading...</p>
      ) : (
        <ul style={{ listStyle: "none", padding: 0 }}>
          {posts.map((post) => (
            <li key={post.id} style={{ borderBottom: "1px solid #eee", padding: "15px 0" }}>
              <strong>{post.name}</strong>
              <p style={{ margin: "5px 0 0 0", color: "#555" }}>{post.content}</p>
            </li>
          ))}
        </ul>
      )}
    </div>
  );
}
— 브라우저에 접속해서 방명록을 테스트 해봅니다.
Access the browser and test the guestbook.