👉🏻 기존 프로젝트(myapp7)에 서버액션 방식을 추가했습니다.
I added the Server Actions approach to the previous project (myapp7).
👉🏻 이전 포스트 / Previous post(myapp7)
📁 전체 프로젝트 구조 / Overall Project Structure(myapp8)
myapp8/
├── app/ (Next.js App Router)
│   ├── api/ (Backend API)
│   │   ├── auth/ (Oauth API)
│   │   │   └── [...nextauth]/
│   │   │       └── route.ts
│   │   └── guestbookapp/ (CRUD API)
│   │       ├── [id]/
│   │       │   └── route.ts
│   │       └── route.ts
│   ├── guestbookapp/ (FrontEnd)
│   │   ├── GuestbookClient.tsx (Component)
│   │   └── page.tsx (Main Page)
│   │
│   ├── guestbookaction/ (FrontEnd)
│   │   ├── db.ts (sqlite3 db connection)
│   │   ├── actions.ts (Server Action)
│   │   ├── GuestbookClient.tsx (Component)
│   │   └── page.tsx (Main Page)
│   │
│   ├── auth.ts (NextAuth Login)
│   ├── favicon.ico
│   ├── globals.css
│   ├── layout.tsx
│   └── page.tsx (Project Main page)
├── .env.local(Environment variable)
└── local.db (SQLite Database)
📁 프로젝트 설치(myapp8)
Project Installation (myapp8)
npx create-next-app@latest📁 sqlite3 모듈 설치
Install the sqlite3 module.
npm install better-sqlite3📁 NextAuth 모듈 설치
Install the NextAuth module.
npm install next-auth@beta📁 서버실행 / Start Servr
npm run dev📁 서버 접속 및 테스트
Server Connection and Testing
✔️ fetch방식 / fetch method
http://localhost:3000/guestbookapp 으로 브라우저에 접속합니다.
Access http://localhost:3000/guestbookapp in your browser.
✔️ Server Action
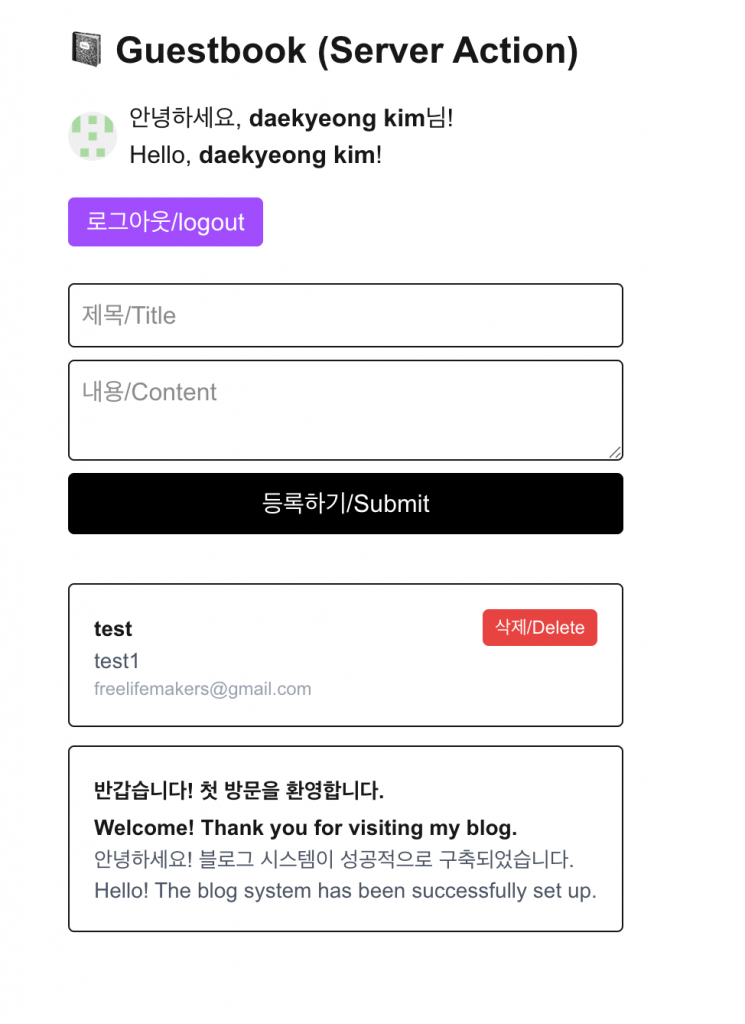
📁 코드 설명 / Code Explanation
✔️ myapp7에 있는 기존 프로젝트는 유지하고 guestabookaction을 추가했습니다.
I retained the existing project in myapp7 and added guestbookaction.
✔️ 작동방식에 있어서 Server Action방식은 기존의 PHP같은 Server Side Script와 유사한 방식입니다.
In terms of how it operates, the Server Action approach is similar to traditional server-side scripting methods like PHP.
✔️ 차이점은 페이지 이동없이 함수실행하는 것으로 데이터베이스에 데이터를 저장하거나 삭제 할 수 있습니다.
The difference is that you can save or delete data in the database by executing a function without navigating to a different page.
✔️ Server Action은 편의성와 보안 측면에서는 장점이지만 모바일 앱이나 Tauri같은 앱과 연동이 어렵다는 단점이 있습니다.
While Server Actions offer advantages in terms of convenience and security, they have the drawback of being difficult to integrate with mobile apps or applications like Tauri.
✔️ 그래서 이 프로젝트에서는 myapp7과 비교 할 수 있게 기존 라우트는 유지하고 새로 guestabookaction 라우트를 추가 했습니다.
Therefore, in this project, I kept the existing route and added a new guestbookaction route to allow for comparison with myapp7.
✔️ ServerAction을 사용하면 깃허브로그인부분을 제외한 api부분은 사용하지 않습니다.
When using Server Actions, the API components—with the exception of the GitHub login—are not used.
✔️ 이 프로젝트에서 서버액션(글 저장과 삭제 기능)은 아래의 파일만 수정하면 됩니다.
For this project, you only need to modify the following file for the server actions (post saving and deletion functions).
myapp8/
└──app/ (Next.js App Router)
   └── guestbookaction/ (FrontEnd)
        ├── db.ts (sqlite3 db connection)
        ├── actions.ts (Server Action)
        ├── GuestbookClient.tsx (Component)
        └── page.tsx (Main Page)
✔️ 데이터베이스 연결
Database Connection
— db.ts파일에서 데이터베이스 연결과 초기데이터를 위한 함수를 셋팅합니다.
In the db.ts file, set up functions for the database connection and initial data.
// app/guestbookaction/db.ts
import path from 'path'
import Database from 'better-sqlite3'

const dbPath = path.join(process.cwd(), 'local.db')

export function getDb() {
  const db = new Database(dbPath)

  // 테이블 생성 / Create table if not exists
  db.exec(`
    CREATE TABLE IF NOT EXISTS posts (
      id INTEGER PRIMARY KEY AUTOINCREMENT,
      slug TEXT UNIQUE NOT NULL,
      title TEXT NOT NULL,
      content TEXT NOT NULL,
      author_email TEXT,
      created_at DATETIME DEFAULT CURRENT_TIMESTAMP
    )
  `)

  // 데이터 없으면 초기데이터 넣기 / If no data, insert initial data
  const checkEmpty = db.prepare('SELECT COUNT(*) as count FROM posts').get() as { count: number }

  if (checkEmpty.count === 0) {
    const insertInitial = db.prepare('INSERT INTO posts (slug, title, content) VALUES (?, ?, ?)')
    const defaultTitle = '반갑습니다! 첫 방문을 환영합니다.\nWelcome! Thank you for visiting my blog.'
    const defaultSlug = 'welcome-to-my-blog'
    const defaultContent = `안녕하세요! 블로그 시스템이 성공적으로 구축되었습니다.\nHello! The blog system has been successfully set up.`
    insertInitial.run(defaultSlug, defaultTitle, defaultContent)
    console.log('초기 데이터 생성됨 / Initial data created')
  }

  return db
}
✔️ 데이터베이스 호출
Database call
— action.ts와 page.ts파일에서 db.ts파일을 호출해서 데이터베이스에 연결합니다.
Connect to the database by calling db.ts from the action.ts and page.ts files.
# action.ts
import { getDb } from './db'

export async function createPost(prevState: any, formData: FormData) {
  const db = getDb()
}

export async function deletePost(id: number) {
  const db = getDb()
}

# page.ts
import { getDb } from './db'

async function getPosts() {
  const db = getDb()
  const posts = db.prepare('SELECT * FROM posts ORDER BY id DESC').all()
  db.close()
  return posts as any[]
}

export default async function GuestbookPage() {
  const session = await auth()
  const posts = await getPosts()


}
✔️ 데이터 조회 및 표시 / Data Fetching and Display
# page.tsx
    <GuestbookClient
      isLoggedIn={!!session?.user}
      userEmail={session?.user?.email || ""}
      posts={posts}
    />

# GuestbookClient.tsx

  return (
    <>
      <ul className="flex flex-col gap-3 mt-8">
        {posts.map((post) => (
          <li key={post.id?? post.slug} className="border p-4 rounded flex justify-between items-start">
            <div>
              <strong className="text-sm whitespace-pre-wrap">{post.title}</strong>
              <p className="text-sm text-gray-600 whitespace-pre-wrap">{post.content}</p>
              <p className="text-xs text-gray-400">{post.author_email}</p>
            </div>

            {post.author_email === userEmail && (
              <button
                onClick={async () => {
                  if (!confirm("삭제할까요? / Are you sure you want to delete this post?")) return;
                  await deletePost(post.id)
                }}
                className="bg-red-500 text-white px-2 py-1 rounded text-xs ml-4 shrink-0"
              >
                삭제/Delete
              </button>
            )}
          </li>
        ))}
      </ul>
    </>
  )

}
1)http://localhost:3000/guestbookaction 이 실행되면 page.tsx가 실행됩니다.
When http://localhost:3000/guestbookaction is executed, page.tsx runs.
2) page.tsx에서 로그인정보와 글을 GuestbookClient.tsx로 값을 넘깁니다.(<GuestbookClient isLogIn- … />)
Pass login information and posts from page.tsx to GuestbookClient.tsx. ()
3)GuestbookClient.tsx에서 actions.ts파일을 호출하고 데이터를 표시(posts.map)합니다.GuestbookClient.tsx calls the actions.ts file and displays the data (posts.map).
4)로그인한 사용자의 이메일과 데이터베이스의 이메일이 같으면 삭제버튼을 노출합니다.
If the logged-in user’s email matches the email in the database, the delete button is displayed.
✔️ 글 수정 및 삭제
Edit or Delete Post
— 실제로 서버액션을 사용하는 부분입니다.
This is the part where Server Actions are actually used.
# GuestbookClient.tsx

import { createPost, deletePost } from "./actions"

... ...

export default function GuestbookClient({
  isLoggedIn,
  userEmail,
  posts
}: {
  isLoggedIn: boolean,
  userEmail: string,
  posts: GuestbookItem[]
}) {
  const [state, formAction, isPending] = useActionState(createPost, null)

  return (
    <>
      {isLoggedIn? (
        <form action={formAction} className="flex flex-col gap-2 my-6">
          <input name="title" placeholder="제목/Title" className="border p-2 rounded" required />
          <textarea name="content" placeholder="내용/Content" className="border p-2 rounded" required />
          <button disabled={isPending} type="submit" className="bg-black text-white p-2 rounded">
            {isPending? '저장중/Submitting...' : '등록하기/Submit'}
          </button>
        </form>
      ) : (
        <p className="my-6 text-gray-500">글을 쓰려면 로그인이 필요해요 / Login is required to write posts.</p>
      )}

      ... ...

            {post.author_email === userEmail && (
              <button
                onClick={async () => {
                  if (!confirm("삭제할까요? / Are you sure you want to delete this post?")) return;
                  await deletePost(post.id)
                }}
                className="bg-red-500 text-white px-2 py-1 rounded text-xs ml-4 shrink-0"
              >
                삭제/Delete
              </button>
            )}

)
}
1) form 태그의 action부분에 {formAction}을 사용해서 데이터를 저장합니다.
Data is saved by using {formAction} in the action attribute of the form tag.
2)deletePost함수를 호출해서 글을 삭제합니다.
Call the deletePost function to delete the post.


