👉🏻 SNS Server를 만들어 봅니다.
Let’s build an SNS server.
👉🏻 웹사이트 화면 이전에 CRUD API부분을 먼저 구현해 봅니다.
We will implement the CRUD API first, before working on the website interface.
📁 전체 프로젝트 구조 / Project Structure
myapp11/ (Root Directory)
├── 📁 app/                    # Next.js App Router
│   ├── 📁 api/
│   │   └── 📁 posts/
│   │       └── 📄 route.ts    # CRUD API
│   ├── 📄 layout.tsx
│   ├── 📄 page.tsx            # Main Home
│   └── 📄 globals.css
├── 📁 lib/
│   └── 📄 db.ts               # SQLite dbconnection(data.sqlite)
├── 📄 data.sqlite             # Local SQLite Database
└── 📄 Caddyfile               # Caddy file
📁 Nextjs 프로젝트 시작 / Starting a Next.js project(myapp11)
npx create-next-app@latest📁 SQLite설치 / Installing SQLite
cd ~/myapp11
npm install better-sqlite3
npm install -D @types/better-sqlite3
📁 API코드 작성
Writing API code
✔️ myapp11/app/api/posts/route.ts
// ~/myapp11/app/api/posts/route.ts
import db from '@/lib/db';
import { randomUUID } from 'crypto';

export async function GET() {
  // R - 읽기 / Read
  const posts = db.prepare('SELECT * FROM posts ORDER BY created_at DESC').all();
  return Response.json(posts);
}

export async function POST(req: Request) {
  // C - 생성 / Create
  const { content } = await req.json();
  if (!content) return Response.json({ error: '내용 없음 / Content is required' }, { status: 400 });

  const id = randomUUID();
  db.prepare('INSERT INTO posts (id, content) VALUES (?, ?)').run(id, content);

  const post = db.prepare('SELECT * FROM posts WHERE id = ?').get(id);
  return Response.json(post);
}

export async function PUT(req: Request) {
  // U - 수정 / Update
  const { id, content } = await req.json();
  if (!id || !content) {
    return Response.json({ error: 'id와 content 필요 / id and content are required' }, { status: 400 });
  }

  const result = db.prepare('UPDATE posts SET content = ? WHERE id = ?').run(content, id);

  if (result.changes === 0) {
    return Response.json({ error: '해당 글 없음 / Post not found' }, { status: 404 });
  }

  const post = db.prepare('SELECT * FROM posts WHERE id = ?').get(id);
  return Response.json(post);
}

export async function DELETE(req: Request) {
  // D - 삭제 / Delete
  const { searchParams } = new URL(req.url);
  const id = searchParams.get('id');
  if (!id) return Response.json({ error: 'id 필요 / You need id' }, { status: 400 });

  db.prepare('DELETE FROM posts WHERE id = ?').run(id);
  return Response.json({ ok: true });
}
✔️ myapp11/db/db.ts
// ~/myapp11/lib/db.ts
import Database from 'better-sqlite3';
import path from 'path';
import fs from 'fs';

const dir = path.join(process.cwd());
const dbPath = path.join(dir, 'data.sqlite');

const db = new Database(dbPath);

// 테이블 생성 / Create table if it doesn't exist
db.exec(`
  CREATE TABLE IF NOT EXISTS posts (
    id TEXT PRIMARY KEY,
    content TEXT NOT NULL,
    created_at DATETIME DEFAULT CURRENT_TIMESTAMP
  );
`);

export default db;
📁 Nextjs 서버실행 / Running the Next.js server
npm run dev📁 다른 터미널에서 글저장 및 목록 보기
Save posts and view lists from another terminal
✔️ 터미널에서 실행합니다.()
Run it in the terminal.
# 글 쓰기 / Write a Post

curl -X POST http://localhost:3000/api/posts -H "Content-Type: application/json" -d '{"content":"첫 글! sqlite에 저장됨"}'

# 글 목록 보기 / View list of posts
curl http://localhost:3000/api/posts

# 글 수정하기 / Edit Post
curl -X PUT http://localhost:3000/api/posts -H "Content-Type: application/json" -d '{"id":"a1b2c3d4-...","content":"수정된 내용/Revised content!"}'


# 글 삭제 / Delete post
curl -X DELETE "http://localhost:3000/api/posts?id=a1b2c3d4-..."
1)글쓰기를 브라우저에서 하려면 page.tsx에 글 전송하는 코드를 별도로 만들어야합니다.
To write posts directly in the browser, you need to create separate code in page.tsx to submit the content.
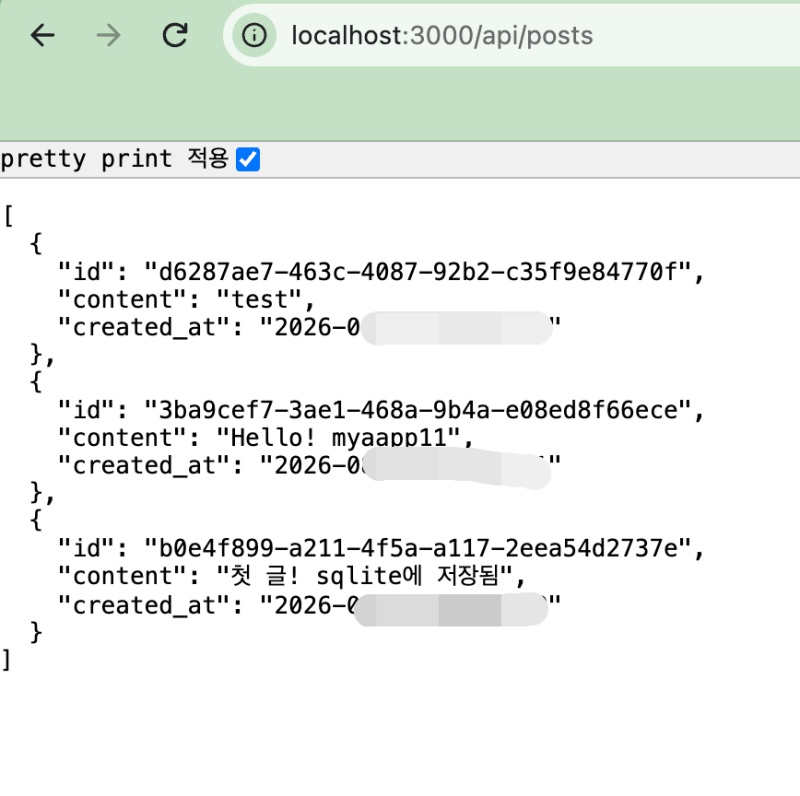
✔️ 브라우저에서 글 목록 보기
View the list of posts in the browser
요한복음 8장 32절 / John 8:32
“그리고 너희는 진리를 알게 될 것이며, 진리가 너희를 자유롭게 할 것이다.”
“Then you will know the truth ,and the truth will set you free”


