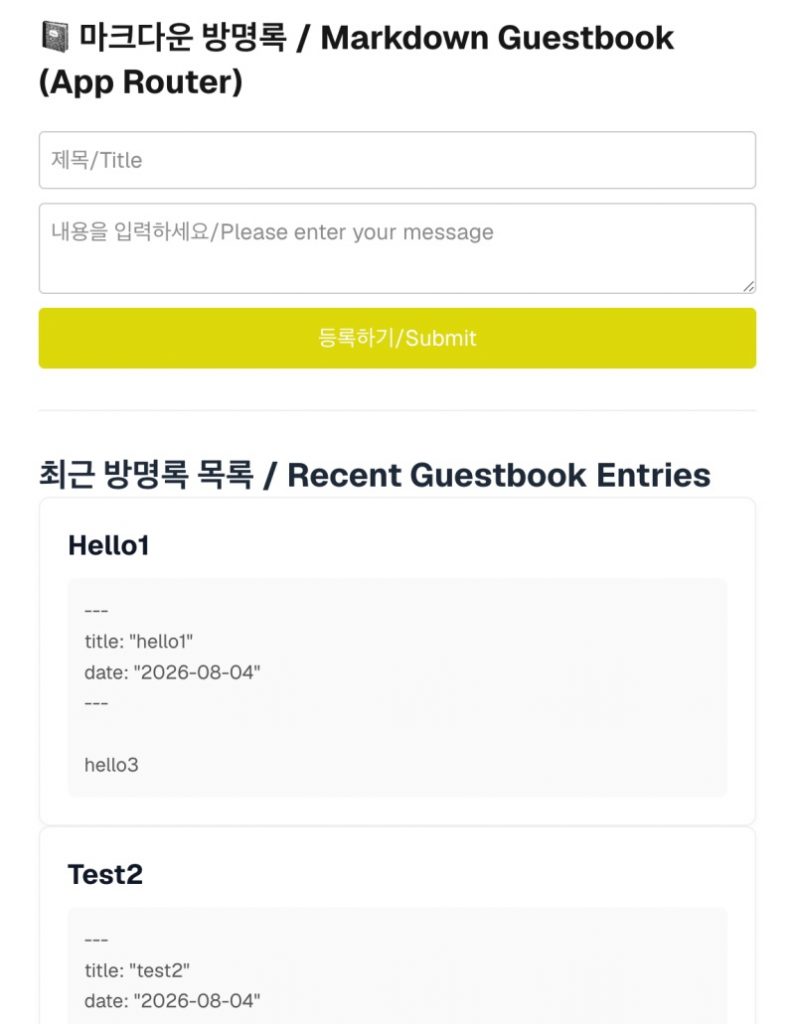
👉🏻 이전 포스트의 기존 방명록에서 데이터를 md(markdown)파일에 저장합니다.
Data from the existing guestbook in the previous post is saved to an MD (Markdown) file.
👉🏻 여기서는 앱 라우트 방식을 사용합니다.
Here, the App Router approach is used.
📁 프로젝트 설치 / Project Installation
npx create-next-app@latest📁 코드 수정 / Code modification
✔️ route.js
— GET함수 / GET function
export async function GET() {
  const postsDirectory = path.join(process.cwd(), 'app', 'posts');

  if (!fs.existsSync(postsDirectory)) {
    return NextResponse.json([]);
  }

  try {
    const fileNames = fs.readdirSync(postsDirectory);
    const mdFiles = fileNames.filter(fileName => fileName.endsWith('.md'));

    // 각 파일의 상세 정보(수정 시간 등)를 포함한 객체 배열 만들기
    // Create an array of objects containing detailed information (modification time, etc.) for each file

    const allPostsData = mdFiles.map((fileName) => {
      const slug = fileName.replace(/\.md$/, '');
      const fullPath = path.join(postsDirectory, fileName);

      // 파일의 상태 정보(생성/수정 시간 등)를 가져옵니다.
      // Retrieves file status information (creation/modification time, etc.).
      const stat = fs.statSync(fullPath);
      const fileContents = fs.readFileSync(fullPath, 'utf8');

      return {
        slug,
        content: fileContents,

        // 정렬 기준으로 삼기 위해 파일 수정 시간을 숫자로 변환하여 보관합니다.
        // Convert the file modification time to a number and store it to use as a sorting criterion.
        dateValue: stat.mtime.getTime(),
      };
    });

    // 최신 수정/생성 시간 기준으로 내림차순(최신순) 정렬하기
    // Sort in descending order (latest first) based on the latest modification/creation time
    allPostsData.sort((a, b) => b.dateValue - a.dateValue);

    // 프론트엔드로 데이터를 넘겨줄 때는 임시 변수인 dateValue를 제외하고 전달 가능합니다.
    // When passing data to the frontend, you can exclude the temporary variable dateValue.
    const sortedPosts = allPostsData.map(({ slug, content }) => ({ slug, content }));

    return NextResponse.json(sortedPosts);

  } catch (error) {
    console.error("파일 읽기 및 정렬 오류 / File reading and sorting error:", error);
    return NextResponse.json({ message: "데이터를 읽어오지 못했습니다/Failed to read data." }, { status: 500 });
  }
}
1)여기는 md파일에서 글을 불러오는 부분입니다.
This is the section where content is loaded from an MD file.
2)app/posts디렉토리에서 fs.readdirSync로 md파일의 내용을 호출합니다.
Retrieve the contents of the .md files using fs.readdirSync in the app/posts directory.
3)파일의 내용을 정렬해서 json데이터로 리턴합니다.
Sorts the file contents and returns them as JSON data.
— POST함수 / POST function
export async function POST(request) {
  try {
    const body = await request.json();
    // 블로그에 맞게 name 대신 title(제목), content(본문)를 받습니다.
    // Instead of name, we receive title and content to fit the blog context.
    const { title, content } = body;

    if (!title || !content) {
      return NextResponse.json(
        { message: '제목과 내용을 모두 입력해주세요.  / Please enter both title and content.' },
        { status: 400 }
      );
    }

    // slug만들기,공백을 하이픈으로 대체하고 특수문자 제거
    // Create a slug by replacing spaces with hyphens and removing special characters
    const slug = title
      .trim()
      .replace(/\s+/g, '-')
      .replace(/[^a-zA-Z0-9가-힣\-]/g, '');

    // 저장할 파일 경로 지정 (app/posts/파일명.md)
    // Specify the file path to save (app/posts/filename.md)
    const postsDirectory = path.join(process.cwd(), 'app', 'posts');

    const fullPath = path.join(postsDirectory, `${slug}.md`);

    // 안전장치: 혹시 똑같은 제목의 파일이 이미 존재하면 충돌 방지
    // Safety measure: Prevent collision if a file with the same title already exists
    if (fs.existsSync(fullPath)) {
      return NextResponse.json(
        { message: '이미 동일한 제목의 글이 존재합니다. / A post with the same title already exists.' },
        { status: 409 }
      );
    }

    // 마크다운 파일에 들어갈 포맷(Front-matter 포함) 구성하기
    // Construct the format (including front-matter) to be included in the markdown file
    const fileContent = `---
title: "${title}"
date: "${new Date().toISOString().split('T')[0]}"
---

${content}`;

    // app/posts 폴더 안에 파일 생성 및 쓰기!
    // Create and write the file inside the app/posts folder!
    fs.writeFileSync(fullPath, fileContent, 'utf8');

    // 성공 시 브라우저(프론트엔드)로 던져줄 결과값
    // he result to be sent to the browser (frontend) upon success
    return NextResponse.json({ slug, content: fileContent }, { status: 201 });

  } catch (error) {
    console.error("마크다운 파일 생성 오류/Markdown file creation error:", error);
    return NextResponse.json(
      { message: '서버에서 파일을 생성하지 못했습니다. / Failed to create markdown file.' },
      { status: 500 }
    );
  }
}
1)글을 md파일에 저장하는 부분입니다.
This is the part where the text is saved to an MD file.
2)포스트마다 md파일을 만들고 글 내용을 md파일에 저장합니다.
For each post, create an MD file and save the content of the post in it.
✔️ page.tsx
— name을 없애고 title로 바꿨기 때문에 관련된 코드는 모두 title로 바꿉니다.
Since name has been removed and replaced with title, update all related code to use title.
— slug는 타입이 없으면 에디터에서 오류로 나타나기 때문에 타입을 지정해줍니다.
Since an error occurs in the editor if the slug lacks a type, we specify a type for it.
interface GuestbookItem {
  id: number;
  title: string;
  slug: string;
  content: string;
}

... 중략 / omitted ...

  const [posts, setPosts] = useState<GuestbookItem[]>([]);
  const [title, setTitle] = useState("");
  const [content, setContent] = useState("");
  const [isLoading, setIsLoading] = useState(true);

... 중략 / omitted ...

    if (!title.trim() || !content.trim()) {
      alert("제목과 내용을 모두 입력해 주세요./Please enter both title and content.");
      return;
    }

... 중략 / omitted ...

      if (response.ok) {
        setTitle("");
        setContent("");
        fetchPosts();
      } else {
        alert("등록에 실패했습니다./Failed to register the entry.");
      }
— 타이틀이나 내용이 화면에 출력가능하도록 아래처럼 코드를 바꿉니다.
Modify the code as shown below so that the title or content can be displayed on the screen.
      <h2 className="text-2xl font-bold text-gray-800">최근 방명록 목록 / Recent Guestbook Entries</h2>
      {isLoading ? (
        <p>로딩 중/Loading...</p>
      ) : posts.length === 0 ? (
        <p>작성된 방명록이 없습니다. 첫 글을 남겨보세요! / There are no guestbook entries yet. Be the first to leave a message!</p>
      ) : (
        <ul style={{ listStyle: "none", padding: 0 }}>
          {posts.map((post) => (
            <li
              key={post.slug}
              style={{
                border: "1px solid #f0f0f0",
                borderRadius: "8px",
                padding: "20px",
                backgroundColor: "#fff",
                boxShadow: "0 2px 4px rgba(0,0,0,0.02)"
              }}
            >
              {/* 파일 이름에서 대문자화 및 하이픈 제거 / Convert file name to a more readable title format (capitalize and remove hyphens) */}
              <strong className="text-xl text-gray-900 block capitalize mb-2">
                {post.slug.replace(/-/g, " ")}
              </strong>

              {/* 마크다운 원본 텍스트 내용 일부 출력 / Display a portion of the original markdown text */}
              <div
                style={{
                  margin: "10px 0 0 0",
                  color: "#555",
                  whiteSpace: "pre-wrap",
                  fontSize: "14px",
                  lineHeight: "1.6",
                  backgroundColor: "#fafafa",
                  padding: "12px",
                  borderRadius: "6px"
                }}
              >
                {post.content}
              </div>
            </li>
          ))}
        </ul>
      )}
📁 Nextjs 서버 실행 / Run Nextjs Server
npm run dev📁 브라우저 접속 http://localhost:3000
Access http://localhost:3000 in your browser.