👉️ 그래픽 모드 전환로 전환하고 화면에 노란색 사각형을 표시합니다.
Switch to graphics mode and display a yellow rectangle on the screen.
👉️ 전체코드 / full code
✔️ boot.asm
[org 0x7c00]
bits 16

start:
    ; 데이터 세그먼트 레지스터 초기화
    ; Initialize data segment registers
    mov ax, 0
    mov ds, ax
    mov es, ax

    ; ----------------------------------------------------
    ; BIOS 인터럽트를 이용해 320x200 256색 그래픽 모드로 전환
    ; Switch to 320x200 256-color graphic mode using BIOS interrupt
    ; ----------------------------------------------------
    mov ah, 0x00        ; 화면 모드 설정 기능 선택
                        ; Select screen mode set function
    mov al, 0x13        ; 320x200 256색 그래픽 모드 번호 (Mode 13h)
                        ; 320x200 256-color graphic mode number (Mode 13h)
    int 0x10            ; 비디오 인터럽트 호출 -> 화면이 검은색 그래픽 창으로 전환됨
                        ; Call video interrupt -> Screen switches to a black graphic window

    ; 디스크 읽기 (2번 섹터부터 1개 섹터를 0x8000에 로드)
    ; Disk read (Load 1 sector from sector 2 into memory 0x8000)
    mov ah, 0x02
    mov al, 1
    mov ch, 0
    mov cl, 2
    mov dh, 0
    mov bx, 0x8000
    int 0x13

    ; 디스크 읽기 실패 시 에러 처리
    ; Error handling if disk read fails
    jc disk_error

    ; 로드된 2번 섹터 코드로 점프하여 실행
    ; Jump to the loaded sector 2 code and execute
    jmp 0x8000

disk_error:
    ; 에러 발생 시 시스템 멈춤 (그래픽 모드이므로 텍스트 출력은 일단 생략)
    ; System hang on error (Text print is omitted for now since it is in graphic mode)
    jmp hang

hang:
    jmp $

; 1번 섹터(MBR) 빈 공간을 0으로 채우고 부트 시그니처 추가
; Fill remaining space of sector 1 (MBR) with 0 and add boot signature
times 510 - ($ - $$) db 0
dw 0xaa55
✔️ sector2.asm
[org 0x8000]
bits 16

start:
    ; ----------------------------------------------------
    ; 루프(반복문)를 사용하여 화면에 큼직한 사각형 그리기
    ; Draw a large rectangle on the screen using loops
    ; ----------------------------------------------------

    ; 사각형을 그리기 위한 시작 좌표 및 크기 설정
    ; Set starting coordinates and size for drawing the rectangle
    ; 시작 위치(Starting position): X=100, Y=50
    ; 사각형 크기(Size): 가로(Width)=50, 세로(Height)=30

    mov dx, 50          ; Y 좌표의 시작값 설정 (세로)
                        ; Set the starting value of the Y coordinate (Row)

draw_row_loop:
    mov cx, 100         ; 새 행(Row)을 시작할 때마다 X 좌표를 다시 100으로 초기화 (가로)
                        ; Reset X coordinate to 100 whenever starting a new row (Column)

draw_col_loop:
    ; BIOS 인터럽트를 사용해 현재 CX, DX 위치에 점 찍기
    ; Draw a pixel at the current CX, DX position using BIOS interrupt
    mov ah, 0x0c        ; 픽셀 쓰기 기능
                        ; Write graphics pixel function
    mov al, 14          ; 색상 번호 (14 = 노란색)
                        ; Color number (14 = Yellow)
    mov bh, 0           ; 페이지 번호 0
                        ; Page number 0
    int 0x10            ; 픽셀 출력
                        ; Output pixel

    inc cx              ; X 좌표를 오른쪽으로 1칸 이동
                        ; Move X coordinate 1 pixel to the right
    cmp cx, 150         ; 가로 길이가 50픽셀이 되었는지 확인 (100 + 50)
                        ; Check if the width reached 50 pixels (100 + 50)
    jl draw_col_loop    ; 150보다 작으면 계속 가로로 점 찍기
                        ; If less than 150, keep drawing pixels horizontally

    ; 가로 한 줄을 다 채웠으면 다음 줄(세로)로 이동
    ; Move to the next line (vertically) once a horizontal row is fully drawn
    inc dx              ; Y 좌표를 아래로 1칸 이동
                        ; Move Y coordinate 1 pixel down
    cmp dx, 80          ; 세로 높이가 30픽셀이 되었는지 확인 (50 + 30)
                        ; Check if the height reached 30 pixels (50 + 30)
    jl draw_row_loop    ; 80보다 작으면 다음 줄로 넘어가서 다시 가로 루프 실행
                        ; If less than 80, go to the next row and run the horizontal loop again

    ; 사각형 그리기가 끝나면 무한 루프로 대기
    ; Infinite loop waiting after rectangle drawing is finished
    jmp $

; 512바이트 크기 맞추기
; Fill up to 512 bytes
times 512 - ($ - $$) db 0
👉️ 컴파일 / compiling
nasm -f bin boot.asm -o boot.bin
nasm -f bin sector2.asm -o sector2.bin
cat boot.bin sector2.bin > temp.bin
dd if=temp.bin of=os.img bs=512 count=2880 conv=sync
qemu-system-x86_64 -drive file=os.img,format=raw,if=floppy -boot a
👉️ 코드설명 / Code Explanation
✔️ boot.asm
–데이터 세그먼트 레지스터 초기화
Initialize data segment registers
start:
    ; 데이터 세그먼트 레지스터 초기화
    ; Initialize data segment registers
    mov ax, 0
    mov ds, ax
    mov es, ax
1) 위의 코드는 초기화만 하고 코드가 사용되는 부분이 없습니다.
The code above only performs initialization; there is no part of the code where it is actually used.
2) 하지만 이 초기화 코드가 없으면 바로 아래에 있는 디스크 읽기 명령어(int 0x13)가 작동하지 않고 에러가 발생하게 됩니다.
However, without this initialization code, the disk read command (int 0x13) immediately below it will not work and will result in an error.
3) 아래 코드에서 데이터를 메모리 0x8000에 저장하라고 bx 레지스터만 설정해 주었습니다.
In the code below, I only configured the bx register to store data at memory address 0x8000.
4) 하지만 BIOS의 디스크 읽기 기능은 무조건 es와 bx 두 레지스터를 합친 주소(es:bx)를 목적지로 인식하도록 하드웨어 규칙이 정해져 있습니다.
However, hardware rules dictate that the BIOS disk read function must treat the address formed by combining the es and bx registers (es:bx) as the destination.
5) 그래서 쓰레기 값이 들어있지 않게 초기화가 반드시 필요합니다.
Therefore, initialization is essential to ensure it does not contain garbage values.
mov bx, 0x8000
int 0x13
— 그래픽 모드 전환
Switch Graphics Mode
1) 이 부분이 실제로 그래픽 모드로 전환하는 부분입니다.
This is the part where it actually switches to graphics mode.
    mov ah, 0x00        ; 화면 모드 설정 기능 선택
                        ; Select screen mode set function
    mov al, 0x13        ; 320x200 256색 그래픽 모드 번호 (Mode 13h)
                        ; 320x200 256-color graphic mode number (Mode 13h)
    int 0x10            ; 비디오 인터럽트 호출 -> 화면이 검은색 그래픽 창으로 전환됨
                        ; Call video interrupt -> Screen switches to a black graphic window
— 나머지 코드는 기존 코드와 동일합니다.
The rest of the code is identical to the existing code.
— 데이터 읽어와 메모리에 저장하기,에러처리,부트시그니처 추가
Reading data and storing it in memory, error handling, and adding a boot signature.
✔️ sector2.asm
👏 모니터 좌표는 좌측 상단이 0.0이고 오른쪽으로 이동할 수록 아래로 이동할 수록 값이 커집니다.
For monitor coordinates, the top-left corner is (0, 0), and the values increase as you move to the right or downward.
— 위에서 아래로 50번째 픽셀(점) 위치의 줄을 의미합니다.
It refers to the line located at the 50th pixel (dot) position from the top.
    mov dx, 50          ; Y 좌표의 시작값 설정 (세로)
                        ; Set the starting value of the Y coordinate (Row)
— 왼쪽에서 오른쪽으로 100픽셀 떨어진 위치를 의미합니다.
It refers to a position 100 pixels away from the left.
draw_row_loop:
    mov cx, 100         ; 새 행(Row)을 시작할 때마다 X 좌표를 다시 100으로 초기화 (가로)
                        ; Reset X coordinate to 100 whenever starting a new row (Column)
— 1픽셀씩 점을 찍습니다.
Place dots one pixel at a time.
— 50픽셀의 점을 1픽셀씩 다 찍으면 다음 줄로 이동합니다.
After plotting 50 dots one pixel at a time, it moves to the next line.
draw_col_loop:
    ; BIOS 인터럽트를 사용해 현재 CX, DX 위치에 점 찍기
    ; Draw a pixel at the current CX, DX position using BIOS interrupt
    mov ah, 0x0c        ; 픽셀 쓰기 기능
                        ; Write graphics pixel function
    mov al, 14          ; 색상 번호 (14 = 노란색)
                        ; Color number (14 = Yellow)
    mov bh, 0           ; 페이지 번호 0
                        ; Page number 0
    int 0x10            ; 픽셀 출력
                        ; Output pixel

    inc cx              ; X 좌표를 오른쪽으로 1칸 이동
                        ; Move X coordinate 1 pixel to the right
    cmp cx, 150         ; 가로 길이가 50픽셀이 되었는지 확인 (100 + 50)
                        ; Check if the width reached 50 pixels (100 + 50)
    jl draw_col_loop    ; 150보다 작으면 계속 가로로 점 찍기
                        ; If less than 150, keep drawing pixels horizontally
— dx50에서 1픽셀이 증가(inc dx)하면 Y값이 51이 됩니다.
If dx50 increases by 1 pixel (inc dx), the Y value becomes 51.
— 즉 다음 줄부터 점을 찍습니다.(X:100,Y:51)
In other words, start plotting points from the next line (X:100, Y:51).
— 세로 크기가 30픽셀인 사각형의 점을 다 찍으면 루프를 빠져나갑니다.
The loop exits once all the points of the 30-pixel-high rectangle have been plotted.
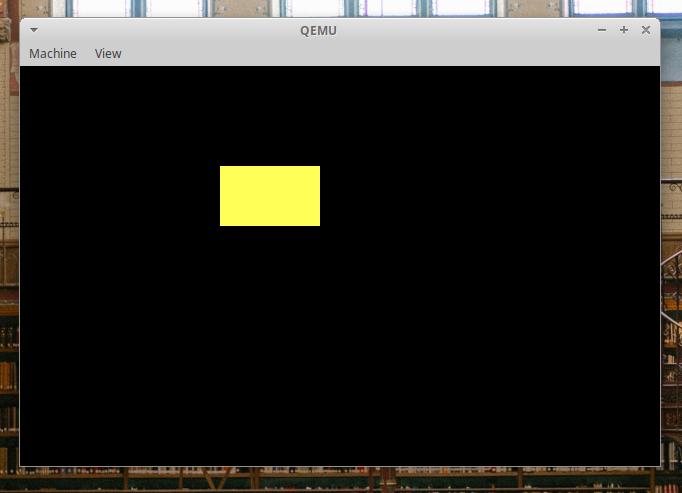
— 그럼 가로 50픽셀 세로 30픽셀인 노란색 사각형을 볼 수 있습니다.
Then, you will see a yellow rectangle that is 50 pixels wide and 30 pixels high.
— dx50에서 1픽셀이 증가(inc dx)하면 Y값이 51이 됩니다.
If dx50 increases by 1 pixel (inc dx), the Y value becomes 51.
— 즉 다음 줄부터 점을 찍습니다.(X:100,Y:51)
In other words, start plotting points from the next line (X:100, Y:51).
— 세로 크기가 30픽셀인 사각형의 점을 다 찍으면 루프를 빠져나갑니다.
The loop exits once all the points of the 30-pixel-high rectangle have been plotted.
— 그럼 가로 50픽셀 세로 30픽셀인 노란색 사각형을 볼 수 있습니다.
Then, you will see a yellow rectangle that is 50 pixels wide and 30 pixels high.
    ; 가로 한 줄을 다 채웠으면 다음 줄(세로)로 이동
    ; Move to the next line (vertically) once a horizontal row is fully drawn
    inc dx              ; Y 좌표를 아래로 1칸 이동
                        ; Move Y coordinate 1 pixel down
    cmp dx, 80          ; 세로 높이가 30픽셀이 되었는지 확인 (50 + 30)
                        ; Check if the height reached 30 pixels (50 + 30)
    jl draw_row_loop    ; 80보다 작으면 다음 줄로 넘어가서 다시 가로 루프 실행
                        ; If less than 80, go to the next row and run the horizontal loop again

    ; 사각형 그리기가 끝나면 무한 루프로 대기
    ; Infinite loop waiting after rectangle drawing is finished
    jmp $