👉️ 함수로 문자열 전체를 화면에 출력하는 코드입니다.
This is code that outputs the entire string to the screen using a function.
👉️ 이전 코드에서 draw_string()함수가 추가됐습니다.
The draw_string() function has been added to the previous code.
👉️ A~Z까지 사용가능하도록 문자를 추가했습니다.
We have added characters to support the full range from A to Z.
👉️ 파일 / files
boot.asm kernel.c sector2.asm👉️ boot.asm과 sector2.asm은 miniOS-9와 동일합니다.
boot.asm and sector2.asm are identical to those of miniOS-9.
👉️ 코드 / Code
typedef unsigned char byte;
// ------------------------------------------------------------------------
// 1. 기본 그래픽 함수 (volatile 적용으로 메모리 강제 쓰기)
// Basic graphics functions (forced memory write via volatile)
// ------------------------------------------------------------------------
void draw_pixel(int x, int y, byte color) {
volatile byte *vram = (volatile byte *)0xA0000;
vram[(y * 320) + x] = color;
}
void clear_screen(byte color) {
for (int y = 0; y < 200; y++) {
for (int x = 0; x < 320; x++) {
draw_pixel(x, y, color);
}
}
}
// ------------------------------------------------------------------------
// 2. 글자 출력 함수 (폰트 데이터를 함수 내부로 이동하여 링킹 오류 해결)
// Character output function (resolved linking errors by moving font data inside the function)
// ------------------------------------------------------------------------
void draw_char(int start_x, int start_y, char c, byte color) {
// A부터 Z까지 총 26개의 알파벳 대문자 8x8 폰트 데이터 세트
byte font_8x8[26][8] = {
{0x18, 0x24, 0x42, 0x7E, 0x42, 0x42, 0x42, 0x00}, // 'A' (index 0)
{0x7C, 0x42, 0x42, 0x7C, 0x42, 0x42, 0x7C, 0x00}, // 'B' (index 1)
{0x3C, 0x42, 0x40, 0x40, 0x40, 0x42, 0x3C, 0x00}, // 'C' (index 2)
{0x78, 0x44, 0x42, 0x42, 0x42, 0x44, 0x78, 0x00}, // 'D' (index 3)
{0x7E, 0x40, 0x40, 0x78, 0x40, 0x40, 0x7E, 0x00}, // 'E' (index 4)
{0x7E, 0x40, 0x40, 0x78, 0x40, 0x40, 0x40, 0x00}, // 'F' (index 5)
{0x3C, 0x42, 0x40, 0x4E, 0x42, 0x42, 0x3C, 0x00}, // 'G' (index 6)
{0x42, 0x42, 0x42, 0x7E, 0x42, 0x42, 0x42, 0x00}, // 'H' (index 7)
{0x3E, 0x08, 0x08, 0x08, 0x08, 0x08, 0x3E, 0x00}, // 'I' (index 8)
{0x03, 0x01, 0x01, 0x01, 0x41, 0x41, 0x3E, 0x00}, // 'J' (index 9)
{0x42, 0x44, 0x48, 0x70, 0x48, 0x44, 0x42, 0x00}, // 'K' (index 10)
{0x40, 0x40, 0x40, 0x40, 0x40, 0x40, 0x7E, 0x00}, // 'L' (index 11)
{0x42, 0x66, 0x5A, 0x42, 0x42, 0x42, 0x42, 0x00}, // 'M' (index 12)
{0x42, 0x62, 0x52, 0x4A, 0x46, 0x42, 0x42, 0x00}, // 'N' (index 13)
{0x3C, 0x42, 0x42, 0x42, 0x42, 0x42, 0x3C, 0x00}, // 'O' (index 14)
{0x7C, 0x42, 0x42, 0x7C, 0x40, 0x40, 0x40, 0x00}, // 'P' (index 15)
{0x3C, 0x42, 0x42, 0x42, 0x4A, 0x44, 0x3A, 0x00}, // 'Q' (index 16)
{0x7C, 0x42, 0x42, 0x7C, 0x48, 0x44, 0x42, 0x00}, // 'R' (index 17)
{0x3C, 0x40, 0x40, 0x3C, 0x02, 0x02, 0x3C, 0x00}, // 'S' (index 18)
{0x7E, 0x08, 0x08, 0x08, 0x08, 0x08, 0x08, 0x00}, // 'T' (index 19)
{0x42, 0x42, 0x42, 0x42, 0x42, 0x42, 0x3C, 0x00}, // 'U' (index 20)
{0x42, 0x42, 0x42, 0x42, 0x42, 0x24, 0x18, 0x00}, // 'V' (index 21)
{0x42, 0x42, 0x42, 0x42, 0x5A, 0x66, 0x42, 0x00}, // 'W' (index 22)
{0x42, 0x42, 0x24, 0x18, 0x24, 0x42, 0x42, 0x00}, // 'X' (index 23)
{0x42, 0x42, 0x24, 0x18, 0x18, 0x18, 0x18, 0x00}, // 'Y' (index 24)
{0x7E, 0x02, 0x04, 0x08, 0x16, 0x20, 0x7E, 0x00} // 'Z' (index 25)
};
// 문자에 맞는 폰트 인덱스 계산 ('A'를 빼서 0~25로 변환)
// Calculate the font index for the character (subtract 'A' to convert to a range of 0–25)
int font_index = 0;
// 'A'에서 'Z'까지 범위 검사
// Check range from 'A' to 'Z'
if (c >= 'A' && c <= 'Z') {
font_index = c - 'A';
} else {
return;
}
for (int y = 0; y < 8; y++) {
byte row_data = font_8x8[font_index][y];
for (int x = 0; x < 8; x++) {
if ((row_data & (0x80 >> x)) != 0) {
draw_pixel(start_x + x, start_y + y, color);
}
}
}
}
// ------------------------------------------------------------------------
// 3. [새로 추가] 문자열을 통째로 넘기면 가로로 정렬해 그려주는 함수
// [New Addition] A function that draws a string horizontally when passed as a whole.
// ------------------------------------------------------------------------
void draw_string(int start_x, int start_y, const char *str, byte color) {
int current_x = start_x;
// 문자열의 끝('\0')을 만날 때까지 한 글자씩 반복수행
// Iterate character by character until the end of the string ('\0') is reached
for (int i = 0; str[i] != '\0'; i++) {
// 공백 문자(' ') 처리: 글자를 그리지는 않고 가로로 8픽셀 건너뜀
// Handle space character (' '): Skip 8 pixels horizontally without drawing a character.
if (str[i] == ' ') {
current_x += 8;
continue;
}
// 현재 글자 그리기 / Drawing current characters
draw_char(current_x, start_y, str[i], color);
// 다음 글자는 가로로 8픽셀 뒤에 그려지도록 좌표 이동 (글자 크기가 8x8이므로)
// Shift the coordinates to draw the next character 8 pixels to the right (since the character size is 8x8).
current_x += 8;
}
}
// ------------------------------------------------------------------------
// 4. 커널 메인 함수
// Kernel main function
// ------------------------------------------------------------------------
void kernel_main(void) {
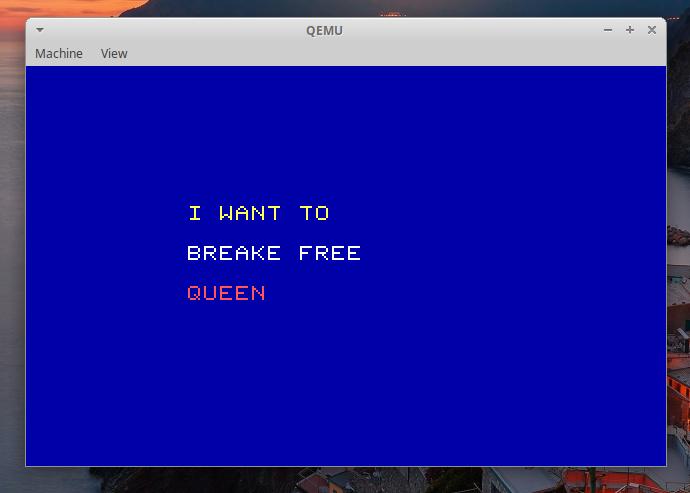
clear_screen(1); // 파란 배경 / Blue background
// -- 함수 한 줄로 문자열 통째로 화면에 출력하기! (현재 폰트는 A~F와 공백만 인식 가능) -- //
// -- Print an entire string to the screen with a single function call! (The current font only supports A–F and spaces.) -- //
// 노란색(14)으로 "I WANT TO" 출력 / Output "BAD CAFE" in yellow (14).
draw_string(80, 70, "I WANT TO", 14);
// 흰색(15)으로 "BREAKE FREE" 출력 / Print "DECADE FACE" in white (15).
draw_string(80, 90, "BREAKE FREE", 15);
// 빨간색(12)으로 "QUEEN" 출력 / Output "FADE" in red (12).
draw_string(80, 110, "QUEEN", 12);
while (1) {
__asm__ __volatile__("hlt");
}
}
👉️ 코드 설명 / Code Explanation
✔️ A~Z까지 문자 범위 검사(대문자)
Check character range from A to Z (uppercase)
👉️ 코드 설명 / Code Explanation
✔️ A~Z까지 문자 범위 검사(대문자)
Check character range from A to Z (uppercase)
1)draw_char함수의 파라메터로 입력된 변수(char c)가 A~Z까지 범위내에 있는지 검사합니다.
It checks whether the variable (char c) passed as a parameter to the draw_char function falls within the range of A to Z.
2) 대문자 아스키 코드 ‘A’ (65) ~ ‘Z’ (90) 입니다.
These are the uppercase ASCII codes ‘A’ (65) through ‘Z’ (90).
3)if (c >= ‘A’ && c <= ‘Z’) { } 는 if (c >= 65 && c <= 90) {}과 같습니다.if (c >= 'A' && c <= 'Z') { } is equivalent to if (c >= 65 && c <= 90) {}.
✔️ draw_string()함수 실행
Execute the draw_string() function.
— kernel_main함수에서 아래와 같이 draw_string()함수를 실행합니다.
In the kernel_main function, execute the draw_string() function as shown below.
draw_string(80, 70, "I WANT TO", 14); 1) draw_string(x,y,”character”,color number)형태입니다.
It takes the form draw_string(x, y, "character", color number).
2) kernel_main함수 내에서 아래처럼 draw_string함수를 실행하면 문자를 출력 할 수 있습니다.
You can output characters by calling the draw_string function within the kernel_main function, as shown below.
draw_string(80, 70, "I WANT TO", 14); ✔️ draw_string()함수
draw_string() function
— draw_string함수를 실행하면 아래의 반복문 로직으로 입력된 문자를 배열로 꺼내서 출력합니다.
When the draw_string function is executed, the loop logic below extracts the input characters into an array and outputs them.
    // 문자열의 끝('\0')을 만날 때까지 한 글자씩 반복수행
    // Iterate character by character until the end of the string ('\0') is reached
    for (int i = 0; str[i] != '\0'; i++) {

        // 공백 문자(' ') 처리: 글자를 그리지는 않고 가로로 8픽셀 건너뜀
        // Handle space character (' '): Skip 8 pixels horizontally without drawing a character.
        if (str[i] == ' ') {
            current_x += 8;
            continue;
        }

        // 현재 글자 그리기 / Drawing current characters
        draw_char(current_x, start_y, str[i], color);

        // 다음 글자는 가로로 8픽셀 뒤에 그려지도록 좌표 이동 (글자 크기가 8x8이므로)
        // Shift the coordinates to draw the next character 8 pixels to the right (since the character size is 8x8).
        current_x += 8;
    }
1)배열 내의 문자에 공백이 있는 경우 우측으로 한칸 띄우기 위해 current_x에 8(픽셀)을 추가합니다.
If there is a space character in the array, 8 (pixels) are added to current_x to shift the position one space to the right.
        if (str[i] == ' ') {
            current_x += 8;
            continue;
        }
2)글자를 그립니다.
Draw the characters.
draw_char(current_x, start_y, str[i], color);3)글자가 그려지면 다음글자를 그리기 위해 우측으로 8픽셀 이동합니다.
Once a character is drawn, the position shifts 8 pixels to the right to draw the next character.
current_x += 8;👉️ 컴파일 / Compiling
# 1. 부트섹터 및 보호모드 진입부 컴파일
# Compiling the Boot Sector and Protected Mode Entry Code
nasm -f bin boot.asm -o boot.bin
nasm -f elf32 sector2.asm -o sector2.o

# 2. 새로 수정한 kernel.c 컴파일
# Compiling the newly modified kernel.c
gcc -m32 -c kernel.c -o kernel.o -nostdlib -fno-builtin -fno-stack-protector -fno-pic -fno-PIE

# 3. 하나의 바이너리로 결합
# Combining into a single binary
ld -m elf_i386 -Ttext 0x8000 -e start -o sector2.bin sector2.o kernel.o --oformat binary

# 4. 이미지 생성 및 실행
# Image Creation and Execution
cat boot.bin sector2.bin > temp.bin
dd if=temp.bin of=os.img bs=512 count=2880 conv=sync
qemu-system-x86_64 -drive file=os.img,format=raw,if=floppy -boot a