👉️ 32비트 보호모드(그래픽모드)에서 화면에 사각형을 보여주는 코드입니다.
This is code that displays a rectangle on the screen in 32-bit protected mode (graphics mode).
👉🏻 이전 miniOS-7에서 코드에서 바뀐 부분만 설명합니다.
This section explains only the changes made to the code from the previous miniOS-7.
👉🏻 코드 / Code
✔️ boot.asm
— boot.asm에서 2번 섹터 코드를 1에서 10으로 수정합니다.
In boot.asm, change the sector code from 1 to 10.
    mov al, 10          ; ✅ 1에서 10으로 수정 (넉넉하게 읽어옴)
                        ; Adjusted from 1 to 10 (read with a generous margin)
1)기존 어셈블리 코드외에 c언어 코드를 추가하면 용량이 증가하기 때문에 c언어 코드용량까지 고려해서 10섹터까지 읽어 오도록 합니다.
Since adding C code alongside the existing assembly code increases the total size, the system is configured to read up to 10 sectors to accommodate the C code.
10개 섹터 크기: 512바이트 × 10 = 5,120바이트 (약 5KB)
Size of 10 sectors: 512 bytes × 10 = 5,120 bytes (approx. 5 KB)
2) 10개 섹터로 넉넉하게 지정해 두면 코드가 잘리는 일 없이 안정적으로 메모리에 다 로드됩니다.
By generously allocating 10 sectors, the code loads reliably into memory in its entirety without being truncated.
✔️ sector2.asm
— [org 0x8000]를 주석처리 하거나 제거합니다.
Comment out or remove [org 0x8000].
; ✅ 코드 제거 / Remove code
;[org 0x8000]
1)[org 0x8000] 이 코드는 순수 바이너리용 입니다.
[org 0x8000] This code is for a raw binary.
2) 그래서 코드 안에 있는 변수나 함수들의 주소를 미리 0x8000 기준으로 전부 고정해서 하나의 완성된 바이너리(.bin) 파일로 컴파일합니다.
Therefore, the addresses of all variables and functions within the code are fixed in advance based on the 0x8000 address, and the code is compiled into a single, complete binary (.bin) file.
3)C언어를 사용하게 되면 C언어 파일(kernel.c)과 어셈블리 파일(sector2.asm)을 함께 묶어야 합니다.
When using the C language, you must combine the C source file (kernel.c) and the assembly file (sector2.asm).
4)그래서 순수 바이너리가 아닌, 조립용 부품 상태인 오브젝트 파일(.o)로 컴파일하게 됩니다.
Therefore, instead of a pure binary, it is compiled into object files (.o)—components intended for assembly.
5) 그러면 다음과 같이 컴파일을 실행합니다.
Then, run the compilation as follows.
ld -m elf_i386 -Ttext 0x8000 -o sector2.bin sector2.o kernel.o --oformat binary6)이때 이미 컴파일했던 sector2.o와 kernel.o를 묶어서 sector2.bin파일을 생성하며 text 섹션 0x8000 주소로 정렬합니다.
At this stage, the previously compiled sector2.o and kernel.o are linked to generate the sector2.bin file, with the text section aligned to address 0x8000.
— text 섹션은 sector2.bin생성시 -Ttext 0x8000 이부분에서 text로 섹션 네임을 지정했기 때문입니다.
The ‘text’ section is named as such because ‘text’ was specified as the section name using -Ttext 0x8000 when generating sector2.bin.
section .text           ;  ELF 포맷 컴파일을 위해 코드 섹션임을 명시합니다.
                        ;  Specifies that it is a code section for ELF format compilation.
— ld명령을 사용할때 링커가 인식하게 하려면 global로 선언해서 외부에 공개해야 합니다.
To ensure the linker recognizes it when using the ld command, you must declare it as global to make it externally visible.
global start            ;  링커가 인식할 수 있도록 start 레이블을 외부에 공개합니다.
                        ;  Expose the `start` label so that the linker can recognize it.
global protected_start  ;  멀리뛰기 목적지 레이블도 외부에 공개합니다.
                        ;  We are also making the long-jump destination labels publicly available
— C언어 변수 및 함수 호출을 위한 스택영역을 지정합니다.
It designates the stack area for C language variables and function calls.
mov esp, 0x90000— C언어의 kernel_main함수를 호출합니다.
It calls the C language’s kernel_main function.
call kernel_main    ; ✅ kernel_main으로 점프!
                    ; Jump to kernel_main!
✔️ kernel.c
–이 코드에서 실제로 사각형을 그립니다.
This code actually draws the rectangle.
typedef unsigned char byte;
// 1. 원하는 위치(x, y)에 원하는 색상(color)의 점을 찍는 함수
// 1. A function that plots a point of a specified color at a desired location (x, y).
void draw_pixel(int x, int y, byte color) {
byte *vram = (byte *)0xA0000;
// 320x200 해상도의 1차원 배열 위치 계산: (y * 320) + x
// Calculation of 1D array position for 320x200 resolution: (y * 320) + x
vram[(y * 320) + x] = color;
}
// 2. 원하는 위치, 크기, 색상으로 사각형을 그리는 함수
// 2. Function to draw a rectangle at a desired position, size, and color
void draw_rect(int start_x, int start_y, int width, int height, byte color) {
for (int y = 0; y < height; y++) {
for (int x = 0; x < width; x++) {
// 위에서 만든 점 찍기 함수를 활용
// Utilize the point-plotting function created above
draw_pixel(start_x + x, start_y + y, color);
}
}
}
// 3. 커널 메인 함수
// 3. Kernel main function
void kernel_main(void) {
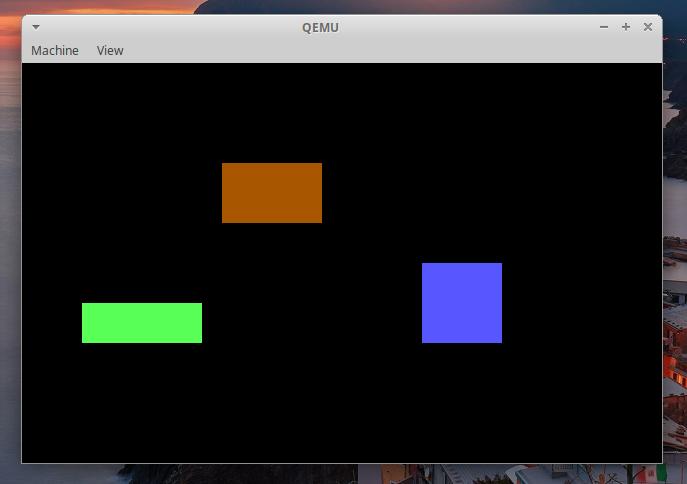
// 예시 1: X=100, Y=50 위치에 가로 50, 세로 30 크기의 갈색(6) 사각형
// Example 1: A brown (6) rectangle with a width of 50 and a height of 30 at position X=100, Y=50
draw_rect(100, 50, 50, 30, 6);
// 예시 2: 다른 위치에 파란색(9) 사각형 추가로 그리기 (색상 변경 테스트)
// Example 2: Draw an additional blue (9) rectangle at a different location (color change test)
draw_rect(200, 100, 40, 40, 9);
// 예시 3: 다른 위치에 초록색(10) 사각형 추가로 그리기
// Example 3: Draw an additional green (10) rectangle at a different location.
draw_rect(30, 120, 60, 20, 10);
// 작업 완료 후 CPU 대기
// Wait for CPU after task completion
while (1) {
__asm__ __volatile__("hlt");
}
}
👉️ 컴파일 / Compiling
# 1. 1번 섹터 부트로더 컴파일
# Compile Sector 1 Bootloader

nasm -f bin boot.asm -o boot.bin

# 2. 2번 섹터 보호모드 진입부 컴파일
# Compiling the Sector 2 protection mode entry section

nasm -f elf32 sector2.asm -o sector2.o

# 3. GCC 컴파일 시 위치 독립적 코드(PIC)를 생성하지 않도록 옵션 추가
# Add an option to prevent the generation of position-independent code (PIC) when compiling with GCC.

gcc -m32 -c kernel.c -o kernel.o -nostdlib -fno-builtin -fno-stack-protector -fno-pic -fno-PIE

# 4. 링커(ld)에게 코드의 시작점(Entry)이 '_start'가 아니라 'start' 임을 명시
# Specify to the linker (ld) that the code entry point is 'start' instead of '_start'

ld -m elf_i386 -Ttext 0x8000 -e start -o sector2.bin sector2.o kernel.o --oformat binary

# 5. 기존 방식대로 디스크 이미지 병합 및 QEMU 실행
# # 5. Merging Disk Images and Running QEMU Using the Existing Method

cat boot.bin sector2.bin > temp.bin
dd if=temp.bin of=os.img bs=512 count=2880 conv=sync
qemu-system-x86_64 -drive file=os.img,format=raw,if=floppy -boot a