👉🏻 open ssh는 네트워크를 통해 컴퓨터에 안전하게 원격 접속할 수 있도록 해주는 오픈소스 보안 프로그램입니다.
OpenSSH is an open-source security program that enables secure remote access to computers over a network.
👉🏻 예전에는 telnet이나 ftp를 사용했었는데 네트워크 상에서 모든 정보가 평문으로 전달 되기때문에 해킹의 위험이 있습니다.
In the past, Telnet or FTP was used, but these carry a risk of hacking because all information is transmitted over the network in plaintext.
👉🏻 그래서 네트워크로 접속시 모든 연결을 암호화해서 해킹을 방지합니다.
Therefore, all connections are encrypted when accessing the network to prevent hacking.
👉🏻 주요기능 / Key Features
✔️ 암호화 통신: 접속하는 모든 데이터(비밀번호, 명령어 등)를 암호화하여 해킹을 방지합니다.
Encrypted Communication: Encrypts all transmitted data (passwords, commands, etc.) to prevent hacking.
✔️ 원격 제어: 텍스트 명령창(CLI)을 통해 멀리 있는 서버를 내 컴퓨터처럼 조작합니다.
Remote Control: Operate a remote server as if it were your own computer via a text command interface (CLI).
✔️ 안전한 파일 전송: SCP나 SFTP 기능을 포함하고 있어 파일을 안전하게 주고받을 수 있습니다.
Secure File Transfer: It includes SCP and SFTP capabilities, allowing for the secure exchange of files.
✔️ 포트 포워딩: 로컬과 원격 컴퓨터의 네트워크 통로를 안전하게 연결해 줍니다.
Port Forwarding: Securely establishes a network connection between local and remote computers.
👉🏻1. OpenSSH(Open Secure Shell))
Installing OpenSSH(Open Secure Shell))
✔️기본적으로 Xubuntu는 SSH 서버가 설치되어 있지 않습니다.
By default, Xubuntu does not come with an SSH server installed.
✔️ 터미널을 열고 아래 명령어로 설치하세요
Open the terminal and install using the command below.
sudo apt update
sudo apt install openssh-server
2. SSH 서비스 시작 및 자동 시작 설정
Start SSH service and configure it to start automatically.
✔️ 설치 후 SSH 서비스가 자동으로 실행되지 않는 경우 아래처럼 실행하고 부팅 시 자동으로 시작되게 설정합니다.
If the SSH service does not start automatically after installation, start it as shown below and configure it to launch automatically upon boot.
sudo systemctl enable --now ssh✔️ 설치 후 서비스 상태 확인하기
Checking the service status after installation
sudo systemctl status ssh✔️ active (running) 상태이면 SSH가 잘 실행 중인 것입니다.
If the status is “active (running),” SSH is running correctly.
3. 방화벽 설정 / Firewall Settings (UFW)
✔️ UFW(Uncomplicated Firewall)를 사용 중이라면 SSH 연결을 허용해줘야 합니다
If you are using UFW (Uncomplicated Firewall), you need to allow SSH connections.
sudo ufw allow ssh✔️ 기본 SSH 포트(22번)에 대해 허용 설정이 생깁니다. 이후 UFW가 활성화되어 있으면 외부에서 접속이 가능해집니다.
An allow rule is created for the default SSH port (port 22). Once UFW is enabled, external access becomes possible.
4. (선택) SSH 설정 변경
(Optional) Change SSH settings
✔️ 기본 설정은 보통 문제 없이 동작하지만, 필요하다면 설정 파일 /etc/ssh/sshd_config 를 편집할 수 있습니다.
The default settings usually work without issues, but you can edit the configuration file /etc/ssh/sshd_config if necessary.
sudo nano /etc/ssh/sshd_config✔️ 예를 들어 root 계정 접속 허용을 바꾸거나 포트 변경 등을 할 수 있습니다. 변경 후에는 서비스 재시작합니다.
For example, you can modify settings such as allowing root account access or changing the port. After making the changes, restart the service.
sudo systemctl restart ssh5. 접속 테스트
Connection Test
✔️ 다른 컴퓨터에서 다음처럼 접속해 봅니다
Try connecting from another computer as follows
ssh username@Xubuntu_IP address⭐️ 서버의 아이피 주소는 다음과 같이 확인 할 수 있습니다.
You can check the server’s IP address as follows.
ip a또는 / or
hostname -I⭐️ 해당 아이피 주소에 연결되는지 확인 하려면 아래처럼 ping을 사용하시면됩니다.
To check if you can connect to the IP address, you can use the ping command as shown below.
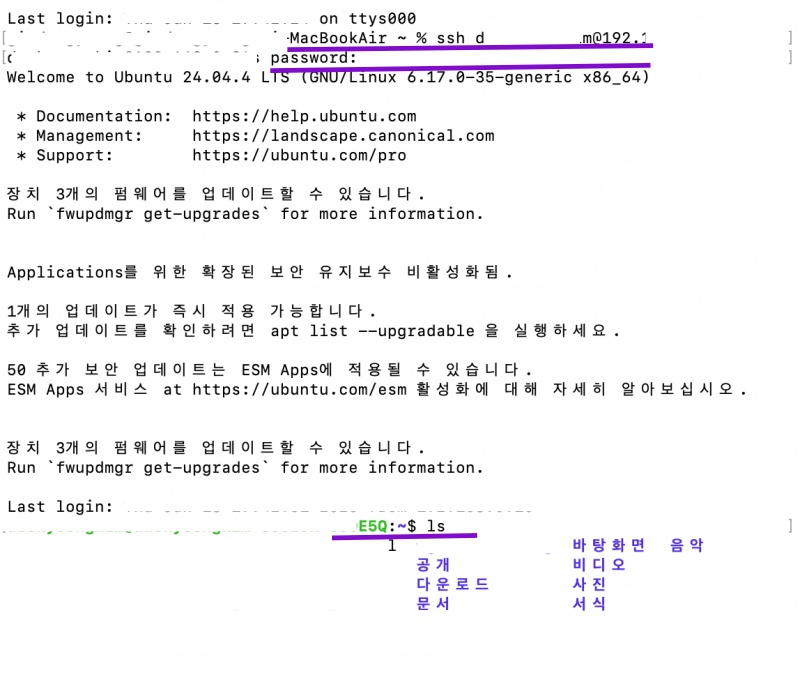
ping IPAddresss✔️ 맥에서 리눅스에 터미널로 접속하기
Connecting to Linux via Terminal from a Mac
✔️ 맥에서 sftp로 리눅스에 접속하기
Connecting to Linux via SFTP from a Mac
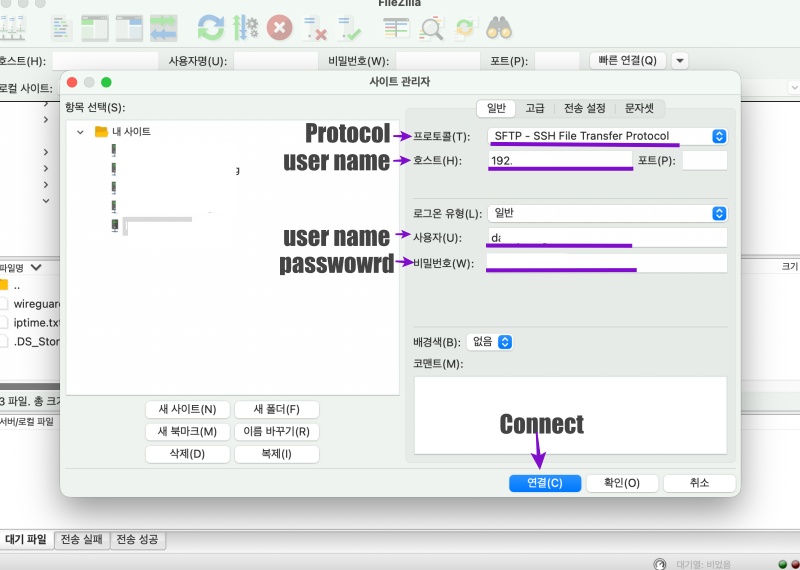

SFTP
